Hi, I’m Anna. I’m 30 years old and based here in the United States, and for as long as I can remember, food has been my way of connecting with people I care about.
I found this Berrylicious Cheesecake Tacos recipe in a sweet Reddit thread about family comfort meals. Someone shared how it reminded them of Sunday gatherings, everyone laughing and helping in the kitchen just like my childhood.
Try it and come back to share I love hearing food stories that feel like home.
Why You’ll Love This Recipe
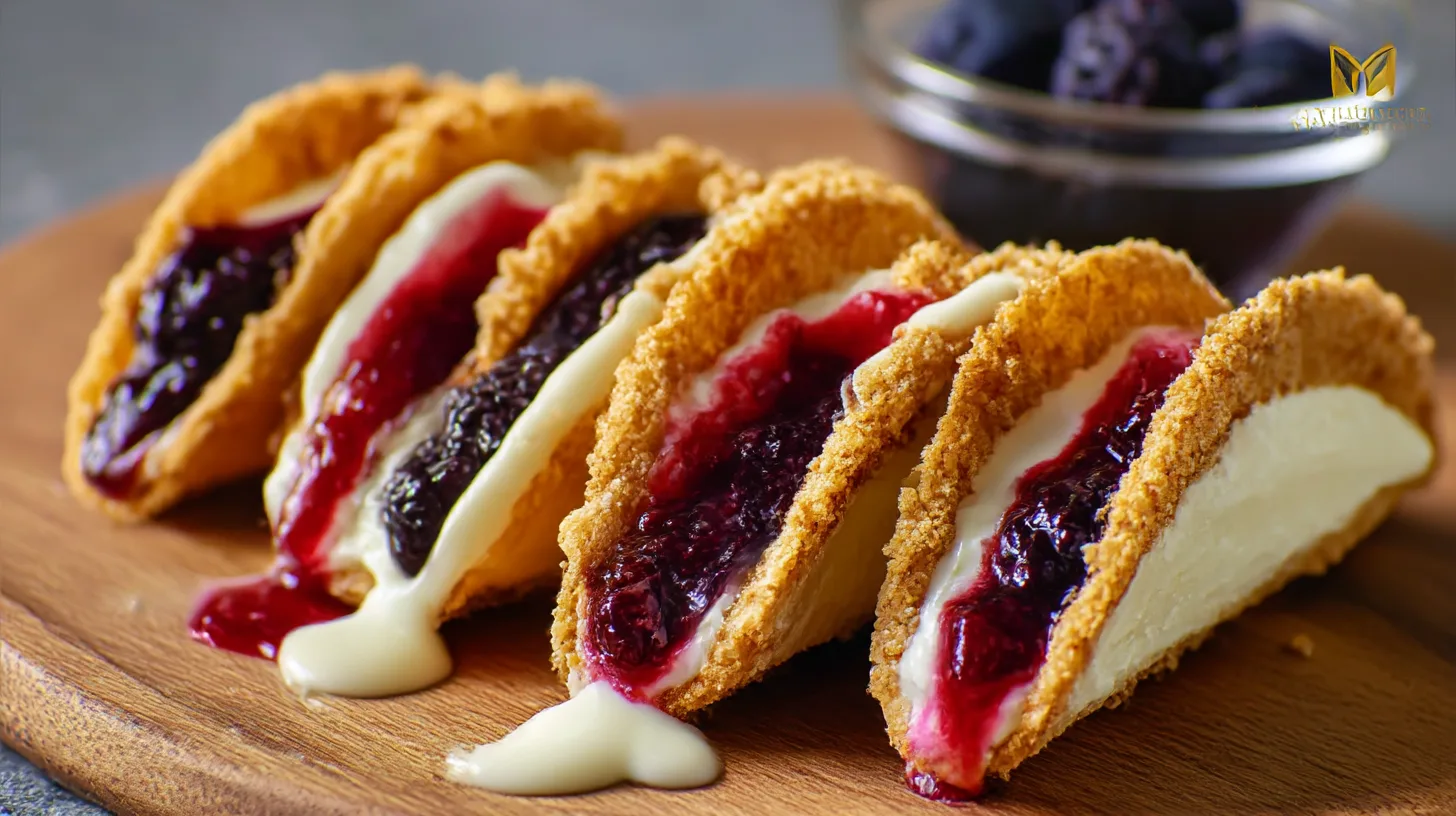
These Berrylicious Cheesecake Tacos are a total crowd-pleaser. They look fancy but come together with simple ingredients you probably already have. The crisp tortilla shell gives you that signature taco crunch, while the cheesecake filling adds a creamy, luscious center that melts in your mouth.
Whether you’re serving them as Sweet Finger Foods for a Party or a fun weekend treat, they’re guaranteed to disappear fast. Plus, they’re customizable — swap the jams, add fresh fruit, or drizzle with chocolate for your own twist!
Ingredients
Tortillas – The “shell” of your dessert tacos; crisp, neutral, and perfect for holding creamy fillings.
Graham Cracker Crumbs – Give that classic cheesecake crust flavor with buttery crunch.
Unsalted Butter (melted) – Helps crumbs stick and adds a rich golden flavor.
Cheesecake Filling
Cream Cheese (room temperature) – Smooth, tangy, and perfectly creamy.
Heavy Cream – Whipped for lightness and a velvety texture.
Powdered Sugar – Sweetens without any graininess.
Lemon Juice – Adds a fresh, subtle tartness.
Vanilla Extract – Brings warmth and depth to the filling.
Toppings
Blueberry Jam – Fruity, tangy-sweet, and rich in color.
Strawberry Jam – Bright, sweet, and perfectly complements the berries and cream.
(Optional: add fresh berries, nuts, or chocolate chips for extra flair!)
Directions
Step 1: Preheat and Prepare
Preheat your oven to 400℉ (200℃). This will give you perfectly crisp shells.
Step 2: Cut and Shape the Shells
Stack your tortillas and use a 1.5-inch cookie cutter to make small circles. To keep them from puffing up, pierce each side gently with a fork.
Step 3: Coat in Butter and Crumbs
Dip each circle in melted butter, then roll in graham cracker crumbs. You’ll immediately see them take on that signature cheesecake color and texture.
Step 4: Bake the Shells
Flip a cupcake pan upside down and carefully tuck each tortilla between the cups to form a taco shape. Bake for about 10–12 minutes, until lightly golden. Let cool completely before filling.
Step 5: Make the Cheesecake Filling
In a large bowl, beat cream cheese, lemon juice, and vanilla until smooth and creamy. In a separate bowl, whip heavy cream with powdered sugar until stiff peaks form. Gently fold the whipped cream into the cream cheese mixture.
Step 6: Assemble the Tacos
Spoon or pipe the cheesecake filling into each cooled shell. Top with a swirl of blueberry and strawberry jam.
Step 7: Chill and Serve
For best texture, refrigerate for 15–20 minutes before serving. Enjoy these little Mini Cheesecake Tacos right away for maximum crunch and creaminess!
Cultural or Technique Note
This recipe celebrates the fun, fusion spirit of American comfort food — where creativity meets familiarity. Turning a taco into a dessert blends the joy of handheld street treats with the creamy indulgence of cheesecake, making it both playful and nostalgic.
Serving Suggestions
These Berrylicious Cheesecake Tacos are delightfully versatile — perfect for every kind of celebration or cozy get-together. Here are a few delicious ways to serve them:
• With a drizzle of chocolate or caramel sauce – For a richer, more indulgent flavor, drizzle warm chocolate ganache or buttery caramel over each taco before serving. It creates that bakery-style finish everyone adores.
• Topped with fresh berries or mint leaves – Add a handful of sliced strawberries, blueberries, or raspberries on top for extra color and freshness. A small mint leaf gives a refreshing aroma that balances the sweetness beautifully.
• Served on a dessert platter for parties – Arrange the tacos on a tiered tray or charcuterie-style dessert board with fruits, nuts, and whipped cream on the side. They’re fun, shareable, and eye-catching — perfect for food truck dessert ideas or party tables.
• As a brunch sweet alongside coffee or tea – These sweet finger foods for parties double as a light brunch treat. Pair them with iced lattes, herbal tea, or even a glass of sparkling lemonade for a refreshing mid-morning pick-me-up.
• With a scoop of vanilla ice cream – For a cool, creamy twist, serve each cheesecake taco with a small scoop of ice cream on the side. The contrast of warm, crispy shell and cold ice cream is heavenly.
Pro Tips for Success
These tips will help your Loaded Cheesecake Tacos turn out perfectly every time:
• Soften the cream cheese completely – Cold cream cheese can lead to lumps. Let it reach room temperature for a perfectly smooth, silky filling.
• Don’t overbake the shells – They should be golden and crisp but not hard. Overbaking can make them too brittle and difficult to fill.
• Use a piping bag for neatness – It makes filling the shells quicker and cleaner, and gives that elegant, bakery-style swirl.
• Chill before serving – Pop the tacos in the fridge for 15–20 minutes before serving. This helps the cheesecake filling firm up and the flavors blend beautifully.
• Add toppings last minute – Wait to spoon on the jams or fresh berries until right before serving so your taco shells stay crisp.
• Play with flavors – Don’t be afraid to try blueberry cheesecake tacos, raspberry preserves, Nutella, or even lemon curd for a creative twist.
• Make mini versions – For a party platter, use smaller tortilla circles to create bite-sized tacos that guests can enjoy in one or two bites.
Common Mistakes to Avoid
Even simple recipes have a few tricks! Here’s how to make sure your Easy Blueberry Cheesecake Tacos turn out perfectly every time:
Skipping the cooling step – Warm shells can cause the cheesecake filling to melt or soften too much. Let them cool fully before assembling.
Overmixing the filling – Mixing too long can deflate the whipped cream, making the filling dense instead of fluffy.
Adding toppings too early – Moist jams or fruit can make the shells soggy if added too soon. Always top just before serving.
Using cold cream cheese – It won’t blend smoothly, leaving small lumps in your filling. Always soften first.
Forgetting to chill before serving – This helps the flavors settle and gives the cheesecake the perfect creamy texture.
Storage & Reheating
Keep your Berrylicious Cheesecake Tacos tasting fresh and delightful with these simple storage tips:
Fridge: Store in an airtight container for 3–4 days. To maintain crispness, store the shells and filling separately if possible, then assemble before serving.
Freezer: Freeze the cheesecake filling separately for up to 2 months. Thaw in the refrigerator and pipe into freshly baked shells when ready.
Reheat: No need! These dessert tacos taste best chilled or at room temperature. If you prefer slightly warm shells, you can briefly toast them before filling.
Frequently Asked Questions
Q1: Can I make these tacos ahead of time?
Yes! You can prepare the shells and cheesecake filling a day ahead. Store the shells at room temperature and the filling in the fridge. Assemble right before serving to keep the shells crisp.
Q2: Can I use different jams or fruits?
: Absolutely! Raspberry, peach, or even mixed berry jams work wonderfully. For a tropical twist, try mango or pineapple jam — they add a sunny flavor to your tacos.
Q3: How do I keep the taco shells from getting soggy?
: Let the shells cool completely after baking and avoid filling them until ready to serve. A quick brush of melted chocolate inside the shell can also act as a moisture barrier.
Q4: Can I make these without an oven?
: Yes! Toast the tortillas in a dry skillet on low heat until golden and firm. Then shape them while warm and let them cool before coating in crumbs and filling.
Q5: Can I make mini versions for a dessert table?
: Definitely! Use smaller tortilla circles (about 2 inches) and fill them lightly. They’re perfect for buffets, brunches, and special events.
Closing Paragraph
These Berrylicious Cheesecake Tacos are the kind of dessert that brings smiles to the table — simple, fun, and totally delicious. Whether you’re hosting a party or treating yourself after dinner, they’re sure to impress. Customize your toppings, make them colorful, and share the joy with family and friends.
Final Thoughts
There’s something magical about taking a classic like tacos and turning it into dessert — it reminds me that cooking is all about creativity and joy. I hope you’ll have as much fun making these as I did. They’re whimsical, sweet, and perfect for sharing.
Berrylicious Cheesecake Tacos
Equipment
- Cupcake pan (flipped upside down)
- Mixing Bowls
- Electric Mixer or Whisk
- Piping bag or spoon
- 1.5-inch cookie cutter
Ingredients
Taco Shells
- tortillas cut into small rounds using a 1.5-inch cutter
- graham cracker crumbs for coating
- unsalted butter melted
Cheesecake Filling
- cream cheese room temperature
- heavy cream
- powdered sugar
- lemon juice
- vanilla extract
Toppings
- blueberry jam for topping
- strawberry jam for topping
- optional toppings fresh berries, chocolate chips, chopped nuts, or mint
Instructions
- Preheat oven to 400°F (200°C).
- Use a 1.5-inch cookie cutter to cut small rounds from tortillas. Pierce each one with a fork to prevent puffing.
- Dip each tortilla round in melted butter, then roll in graham cracker crumbs until coated.
- Flip a cupcake pan upside down and place the coated tortilla rounds between the cups to form taco shapes. Bake for 10–12 minutes, until golden and crisp. Let cool.
- In a bowl, beat cream cheese with lemon juice and vanilla until smooth. In a separate bowl, whip heavy cream and powdered sugar until stiff peaks form. Fold whipped cream into cream cheese mixture.
- Fill each cooled shell with the cheesecake mixture using a spoon or piping bag.
- Top with blueberry and strawberry jam. Add optional toppings like fresh berries or chocolate chips if desired.
- Chill for 15–20 minutes before serving for best texture and flavor.