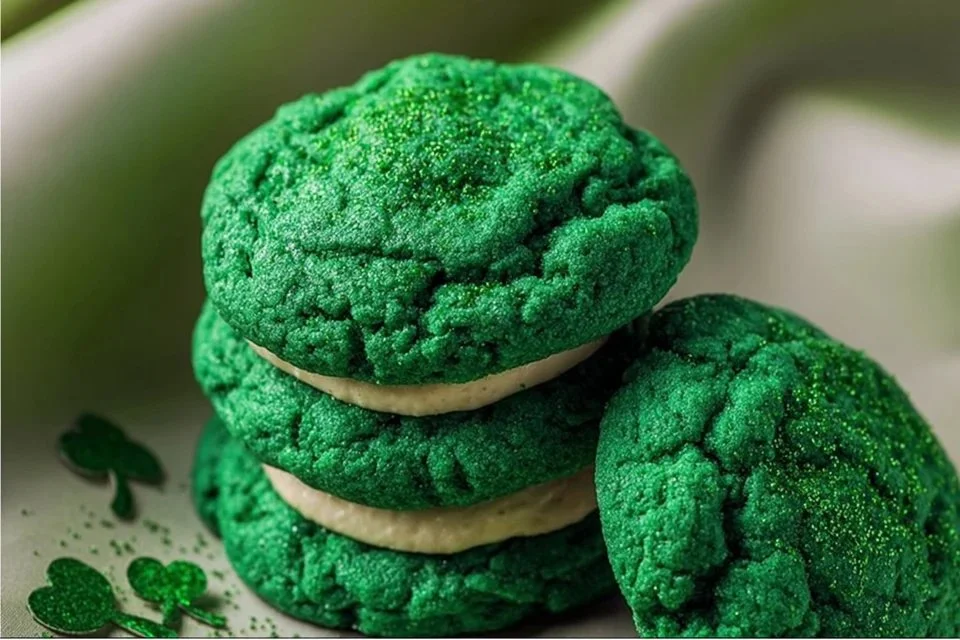
Why You’ll Love This Recipe
These Green Velvet Cookies offer both ease and reliability, making them a go-to recipe for any occasion. Their comforting flavor balances sweetness with a touch of vanilla, creating a delightful snack that’s perfect for sharing. Practical in preparation, this recipe uses common ingredients found in most home kitchens, ensuring you can whip up a batch whenever the moment calls for a sweet treat. They fit seamlessly into everyday life, from family gatherings to casual dessert cravings.
Kitchen Tools You’ll Need
- Mixing bowl
- Baking tray
- Electric mixer
- Sieve
- Rubber spatula
Ingredients
- 125g (4oz) Odlums Self Raising Flour (structure)
- 125g (4oz) Butter or Margarine (at room temperature) (moisture)
- 125g (4oz) Caster Sugar (sweetness)
- 2 Large Eggs (at room temperature) (structure)
- 2 tablespoons Milk (moisture)
- Few drops Vanilla Essence (flavor)
- 125g (4oz) Butter (at room temperature) for decoration (texture)
- 225g (8oz) Icing Sugar, sieved for decoration (sweetness)
- Few drops Vanilla Essence for decoration (flavor)
- Green Food Colouring for decoration (color)
- Optional: Green or White ready-to-roll icing for shamrock shapes (texture)
How to Make Green Velvet Cookies
Step 1. Begin by preheating your oven to 180°C (350°F). It’s essential that the oven is at the right temperature before you start baking, as this helps the cookies rise adequately and achieve the desired texture. A properly preheated oven ensures even baking throughout, leading to cookies that are soft and slightly chewy.
Step 2. Next, take a mixing bowl and combine the caster sugar and room-temperature butter or margarine. Use an electric mixer on medium speed to cream them together until the mixture is light and fluffy. This might take a couple of minutes. You want to see a noticeable color change and texture that resembles whipped cream, indicating that it’s well aerated.
Step 3. Once creamed, add in the large eggs, one at a time. Mix well after each addition to fully incorporate them into the butter and sugar blend. This step is vital for achieving a smooth batter; be sure to scrape down the sides of the bowl as needed, ensuring everything is well mixed before moving on to the next step.
Step 4. Gradually add the self-raising flour to the mixture, mixing on low speed until just combined. It’s important to not overmix at this stage. You should see a soft dough forming; the mixture will be somewhat sticky but will pull away from the sides of the bowl cleanly.
Step 5. Incorporate the milk and a few drops of vanilla essence into your dough. Mix gently until the liquid is absorbed. This addition helps with the moisture content, making the cookies softer and complementing their flavor without making the dough too runny. Once combined, you should have a homogenous dough.
Step 6. If desired, add a few drops of green food coloring to the dough and mix until the color is consistent throughout. This step is where the signature “green velvet” comes to life. Start with just a few drops, as you can always add more to achieve the desired shade, ensuring your cookies are vibrant but not overpowering.
Step 7. Using a spoon or a cookie scoop, portion out the dough and place them onto a baking tray lined with parchment paper. Leave enough space between each cookie to allow for spreading during baking. It’s helpful to shape each portion gently into rounds for a more uniform appearance.
Step 8. Bake in the preheated oven for about 10-12 minutes, or until the edges start to turn lightly golden. Keep an eye on them, as baking times may vary with different ovens. You want them firm around the edges but still soft in the center, as they will continue to set while cooling.
Step 9. Once baked, remove the tray from the oven and allow the cookies to cool on the tray for a few minutes before transferring them to a wire rack. This cooling time helps them firm up. Be gentle while moving them, as they can be quite soft right out of the oven.
Step 10. For the decoration, take the additional butter and soften it, then mix it with icing sugar and a few drops of vanilla essence until creamy and spreadable. This will be your frosting, providing sweetness and a nice finish to your cookies, making them extra special.
Step 11. Once the cookies are fully cooled, spread or pipe the prepared icing on top of each cookie. Feel free to be creative with the decoration! Depending on your preference, you can add ready-to-roll icing shaped as shamrocks for added charm and festivity, enhancing the presentation and fun of the cookies.
Serving Suggestions
These Green Velvet Cookies are versatile and can be enjoyed throughout the day. They can serve as a delightful treat alongside a cup of coffee in the morning or as an afternoon snack after school. If you have leftovers, they can easily be shared during family gatherings or parties. Their unique color and flavor make them a delightful addition to holiday-themed dessert tables, captivating both kids and adults alike.
Pro Tips for Best Results
- Use room temperature ingredients for better mixing and a smoother batter.
- Allow proper cooling time for cookies to set before decorating.
- Experiment with the amount of food coloring to customize the shade.
- Don’t skip the vanilla essence; it enhances the overall flavor.
- Keep an eye on the baking time to prevent overbaking.
- Use high-quality butter for richer flavor in both the cookies and icing.
Common Mistakes to Avoid
- Using Cold Butter or Eggs: This can prevent proper creaming and mixing, leading to dense cookies. Always use room-temperature ingredients for the best results.
- Overmixing the Dough: Overmixing can lead to tough cookies instead of soft and tender ones. Mix just until the ingredients are combined to maintain the right texture.
- Skipping the Cooling Period: Immediate decorating on warm cookies can cause the icing to melt. Let the cookies cool completely for a better frosting experience.
- Not Measuring Ingredients Accurately: Inaccurate measurements, especially for flour and sugar, can affect the texture and taste. Use a kitchen scale for precise measurement.
- Ignoring Oven Temperature: Baking at a temperature that is too low or high can lead to improper baking. Always preheat the oven and use an oven thermometer if necessary.
- Baking on a Crowded Tray: Placing cookies too close can cause them to merge while baking. Ensure enough space between each cookie to allow for spreading.
Variations & Substitutions
- For a festive touch, consider adding chocolate chips or nuts to the dough.
- Change the food coloring to create cookies for different occasions.
- Use flavored extracts, such as almond or mint, for a twist on the classic flavor profile.
- If desired, top with sprinkles or edible glitter for a fun finish for parties.
Storage & Reheating
Store the cookies at room temperature in an airtight container for up to five days to maintain freshness. If you prefer longer storage, you can keep them in the refrigerator. To freeze, wrap each cookie tightly in plastic wrap and place them in an airtight container for up to three months. When ready to enjoy, simply let them thaw at room temperature or warm them gently in the microwave for a few seconds to regain their soft texture.
Nutrition Information
Nutrition information was not provided for this recipe.
Nutrition values are estimates and may vary based on ingredients used.
Frequently Asked Questions
Can I make this recipe ahead of time?
Yes, you can prepare the cookie dough and store it in the refrigerator for a day before baking. This also allows the flavors to develop further. Just let it come to room temperature before scooping and baking.
How long does it last in the fridge?
When stored in an airtight container, these cookies can last for up to one week in the refrigerator. However, they are best enjoyed fresh in the first few days after baking.
Can I freeze this recipe?
Certainly! These cookies freeze well. Wrap them individually in plastic wrap and store them in a freezer bag. They will keep for about three months. Simply thaw at room temperature when you’re ready to enjoy them.
What can I substitute for one ingredient?
You could replace butter with margarine in equal amounts if you prefer a dairy-free option. Remember, this may alter the flavor slightly but will still yield enjoyable cookies.
Why didn’t my recipe turn out as expected?
There can be many factors, such as incorrect ingredient measurements, using cold ingredients, or not baking at the right temperature. Always double-check your steps and ensure your oven is properly calibrated for best results.
Final Thoughts
Making Green Velvet Cookies is a simple yet rewarding process that leads to deliciously vibrant treats. Whether for a special occasion or just a cozy afternoon, these cookies bring a smile to anyone who views or tastes them. They are easy to make and even easier to enjoy, providing reassurance that baking can be both fun and fulfilling. Happy baking, and enjoy sharing these joyful cookies with loved ones!

Green Velvet Cookies
Ingredients
Main Ingredients
- 125 g Odlums Self Raising Flour (structure)
- 125 g Butter or Margarine (at room temperature) (moisture)
- 125 g Caster Sugar (sweetness)
- 2 Large Eggs (at room temperature) (structure)
- 2 tablespoons Milk (moisture)
- few drops Vanilla Essence (flavor)
Decoration Ingredients
- 125 g Butter (at room temperature) for decoration (texture)
- 225 g Icing Sugar, sieved for decoration (sweetness)
- few drops Vanilla Essence for decoration (flavor)
- Green Food Colouring for decoration (color)
- Optional: Green or White ready-to-roll icing for shamrock shapes (texture)
Instructions
Preparation
- Preheat your oven to 180°C (350°F).
- In a mixing bowl, cream together the caster sugar and room-temperature butter or margarine using an electric mixer until light and fluffy.
- Add the large eggs one at a time, mixing well after each addition.
- Gradually add the self-raising flour and mix on low speed until just combined.
- Incorporate the milk and vanilla essence into the dough, mixing gently.
- Add a few drops of green food coloring and mix until the color is consistent throughout.
Baking
- Portion out the dough using a spoon or cookie scoop onto a baking tray lined with parchment paper.
- Bake in the preheated oven for about 10-12 minutes, or until the edges start to turn lightly golden.
- Remove the tray from the oven and allow the cookies to cool for a few minutes before transferring them to a wire rack.
Decoration
- Mix additional softened butter with icing sugar and vanilla essence until creamy and spreadable.
- Once cookies are cooled, spread or pipe the icing on top of each cookie, and consider adding ready-to-roll icing shaped like shamrocks.