Cooking a whole chicken can feel like an event, and this recipe offers a straightforward path to delicious results. Whether you’re grilling on a weeknight, celebrating on the weekend, or enjoying a quiet moment, Beer Can Chicken is a wonderful option that brings both ease and comfort to the table. The soothing aroma of herbs and spices as the chicken roasts creates a cozy atmosphere, inviting everyone to gather around and dig in. Let’s get started with this simple, effective dish.
Why You’ll Love This Beer Can Chicken in oven
This method for Beer Can Chicken delivers both ease and reliability, making it a go-to favorite for many. With its balanced flavors from spices and the moisture infused from the beer, every bite is satisfying. It’s practical for everyday gatherings, offering a comforting meal that everyone can enjoy. Plus, you’ll appreciate how straightforward the preparation is.
Kitchen Tools You’ll Need
- Grill or oven-safe can holder (if available)
- Meat thermometer
- Basting brush (optional)
- Sharp knife
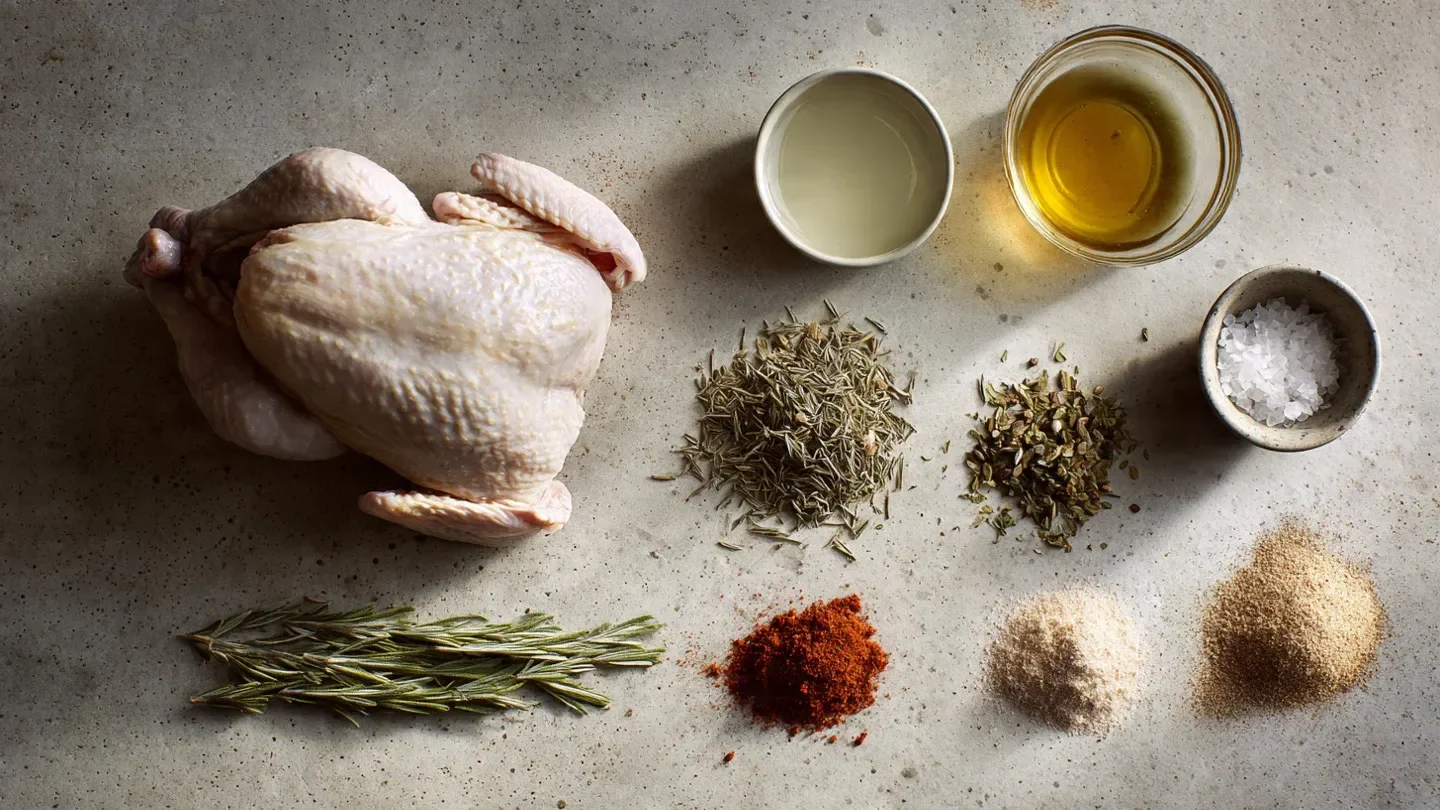
Ingredients
- 1 whole chicken (provides protein and texture)
- 1 can of beer (adds moisture and flavor)
- 3 tablespoons olive oil (provides moisture and enhances browning)
- 1 tablespoon dry oregano (adds herbal flavor)
- 1 tablespoon dry rosemary (contributes earthy notes)
- 1 teaspoon salt (enhances flavor)
- 1 teaspoon ground black pepper (adds mild heat)
- 1 teaspoon smoked paprika (provides smoky depth)
- 1 teaspoon paprika (adds color and mild flavor)
- 1 teaspoon garlic powder (introduces savory notes)
How to Make Beer Can Chicken in oven
Step 1. Start by preheating your grill or oven. This will set the stage for the chicken to cook evenly. If using a grill, ensure it reaches a steady temperature for roasting. If you’re opting for an oven, can be set to the desired temperature, which helps to develop a good roast on the chicken. Visual cues from the environment will indicate it’s ready.
Step 2. While your cooking appliance is heating, prepare the chicken. Rinse the bird under cold water, and pat it dry using paper towels. This step is pivotal as a dry surface helps achieve that desirable crispy skin. Make sure to check the cavity as well, ensuring it’s clear of any remaining feathers or innards.
Step 3. In a bowl, mix together the olive oil, oregano, rosemary, salt, pepper, smoked paprika, paprika, and garlic powder. This combination of spices will create a flavorful rub. Coat the chicken generously with this mixture, making sure to cover all sides. The oil helps to carry the spices, leading to a well-seasoned exterior once cooked.
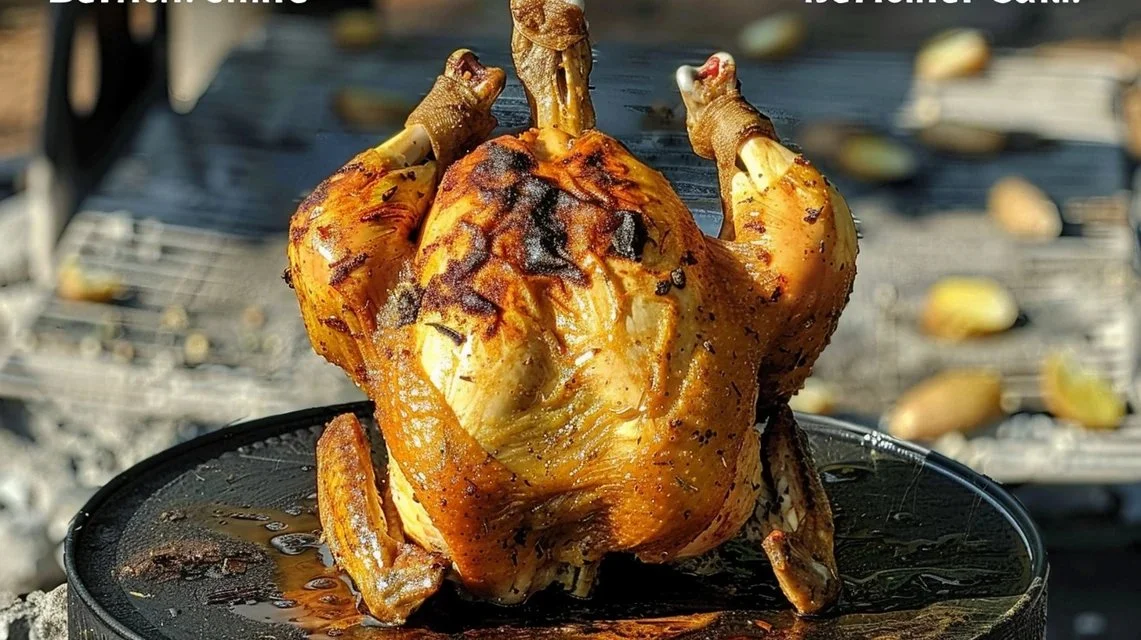
Step 4. Open the can of beer and take a few sips (or pour out if you prefer). Carefully place the open beer can inside the cavity of the chicken. This technique not only supports the chicken upright but allows the beer to infuse moisture into the meat during cooking. Take care to ensure the chicken is balanced and steadies on the can.
Step 5. Once your grill or oven is ready, place the chicken upright, propped on the beer can, directly on the grill rack or in the center of the oven. The heat will circulate around the chicken, promoting even cooking. Keep an eye on it; you want to ensure it stabilizes comfortably without tipping over.
Step 6. Cook the chicken until it reaches an internal temperature of 165°F in the thickest part of the thigh. Using a meat thermometer, check periodically to avoid overcooking. When properly cooked, the juices should run clear, and the skin should be golden and crispy. Enjoy the enticing aroma wafting through your kitchen during this time.
Step 7. Once the chicken is fully cooked, carefully remove it from the grill or oven. Let it rest for about ten minutes before carving. This resting period allows the juices to redistribute throughout the meat. You’ll notice the scent and the allure of a well-roasted chicken as you prepare to serve it.
Step 8. Carefully remove the can from the chicken before serving. Be mindful, as the can and liquid can be hot. Enjoy slicing the chicken and serving it with your favorite sides. You’ll appreciate the tender, juicy meat and the depth of flavor infused throughout the bird.
Serving Suggestions
This Beer Can Chicken is versatile and can easily fit into various meal occasions. It makes a delightful centerpiece for family meals, and the leftovers are perfect for lunch. Use any remaining chicken for sandwiches or wraps, or simply enjoy it as a quick snack. If you have guests, consider serving it with simple sides like roasted vegetables or a fresh salad for a balanced plate. This dish also works well for casual gatherings where everyone can help themselves.
Pro Tips for Best Results
- Ensure your chicken is completely dry before applying the rub to achieve a crispy skin.
- Use a meat thermometer to ensure the chicken is cooked through without drying it out.
- Let the chicken rest before carving to retain its juices.
- Consider trying different flavors of beer for varied taste profiles.
- Avoid overcrowding the grill or oven to allow for even cooking.
- Make sure the chicken is balanced on the beer can to prevent tipping during roasting.
Common Mistakes to Avoid
One common mistake is not drying the chicken properly. This can result in less crispy skin, as moisture on the surface prohibits browning. Always pat it dry with paper towels before seasoning. Another issue is using an overly large can of beer. A standard-size can is adequate; larger cans can unbalance the chicken. Failing to check the internal temperature can lead to undercooked meat or dry chicken. Using a thermometer helps ensure perfect doneness. Not allowing the chicken to rest can lead to dry meat; always let it rest to maintain juiciness. Avoid rushing the cleanup process; hot cans can cause burns. Handle them with care after cooking. Lastly, relying on visual cues alone may lead to inconsistencies, so measuring temperature is key.
Variations & Substitutions
For variations, consider using different herbs like thyme or basil in the spice rub for a fresher taste. You can also experiment with other liquids such as soda or cider for unique flavor profiles. Some cooks enjoy adding citrus slices inside the cavity before placing it on the can to add brightness to the flavor. Adjust the paprika for a stronger or milder taste based on your preference.
Storage & Reheating
Leftover Beer Can Chicken should be stored at room temperature if you’re planning to eat within two hours. For longer storage, place it in an airtight container and keep it in the refrigerator for up to three days. If you’d like to freeze it, wrap the chicken securely in plastic wrap, then aluminum foil to preserve flavor and texture, and store it in the freezer for up to three months. For reheating, place the chicken in a covered baking dish in a preheated oven at a low temperature to keep it from drying out, or you can microwave it on a reduced power setting, checking frequently until warmed through.
Frequently Asked Questions
Can I make this recipe ahead of time?
While you can prepare the chicken and seasoning in advance, it’s best to cook it fresh right before serving to enjoy the best flavor and texture. You may also marinate the chicken overnight, but assemble with the beer right before cooking.
How long does it last in the fridge?
Stored in an airtight container, leftover Beer Can Chicken can be enjoyed up to three days. This makes it a great option for meal prep or using in different recipes throughout the week.
Can I freeze this recipe?
Yes, if you have leftovers, Beer Can Chicken freezes well. Wrap it tightly in plastic wrap and foil to prevent freezer burn. Use it within three months for the best taste and texture.
What can I substitute for one ingredient?
If you need to substitute an ingredient, consider using a different herb or spice that you enjoy. For instance, parsley could replace oregano or rosemary. It’s important to adjust to taste, but most spices work well in this recipe.
Why didn’t my recipe turn out as expected?
This might happen for several reasons, such as undercooking or overcooking the chicken. Using a meat thermometer can help prevent this. Also, be sure to properly dry the chicken and apply the seasoning evenly to enhance flavor and crispness.
Final Thoughts
Making Beer Can Chicken is a straightforward process that often becomes a favorite way to prepare a whole chicken. The combination of herbs and beer creates a flavorful and juicy result that’s perfect for gatherings or simple family dinners. Enjoying the warmth and comfort of a home-cooked meal is always a rewarding experience. Rest assured, following this recipe can lead to satisfying results that will have everyone coming back for seconds.

Beer Can Chicken
Ingredients
Main Ingredients
- 1 whole whole chicken provides protein and texture
- 1 can can of beer adds moisture and flavor
- 3 tablespoons olive oil provides moisture and enhances browning
- 1 tablespoon dry oregano adds herbal flavor
- 1 tablespoon dry rosemary contributes earthy notes
- 1 teaspoon salt enhances flavor
- 1 teaspoon ground black pepper adds mild heat
- 1 teaspoon smoked paprika provides smoky depth
- 1 teaspoon paprika adds color and mild flavor
- 1 teaspoon garlic powder introduces savory notes
Instructions
Preparation
- Preheat your grill or oven to the desired temperature.
- Rinse the chicken under cold water and pat it dry with paper towels.
- In a bowl, mix olive oil, oregano, rosemary, salt, pepper, smoked paprika, paprika, and garlic powder.
- Coat the chicken generously with the spice mixture.
- Open the beer can and take a few sips. Place the can inside the cavity of the chicken.
Cooking
- Place the chicken upright on the beer can directly on the grill rack or in the center of the oven.
- Cook the chicken until it reaches an internal temperature of 165°F in the thickest part of the thigh.
Finishing Touches
- Once fully cooked, carefully remove the chicken from the grill or oven and let it rest for about ten minutes.
- Remove the can before serving and enjoy slicing the chicken.