Hi, I’m Ella. I’m 32 years old and living in the United States, and my love for cooking grew from simple curiosity into something that feels like a lifelong passion.
It’s nearly midnight, and Salma sits quietly at her kitchen table, notebook open beside her laptop. The gentle hum of the fridge blends with soft music as she rewinds a YouTube tutorial, focused and determined to master each step.
Follow along and let me know how it turns out — learning’s more fun when we do it together.
Why You’ll Love This Recipe
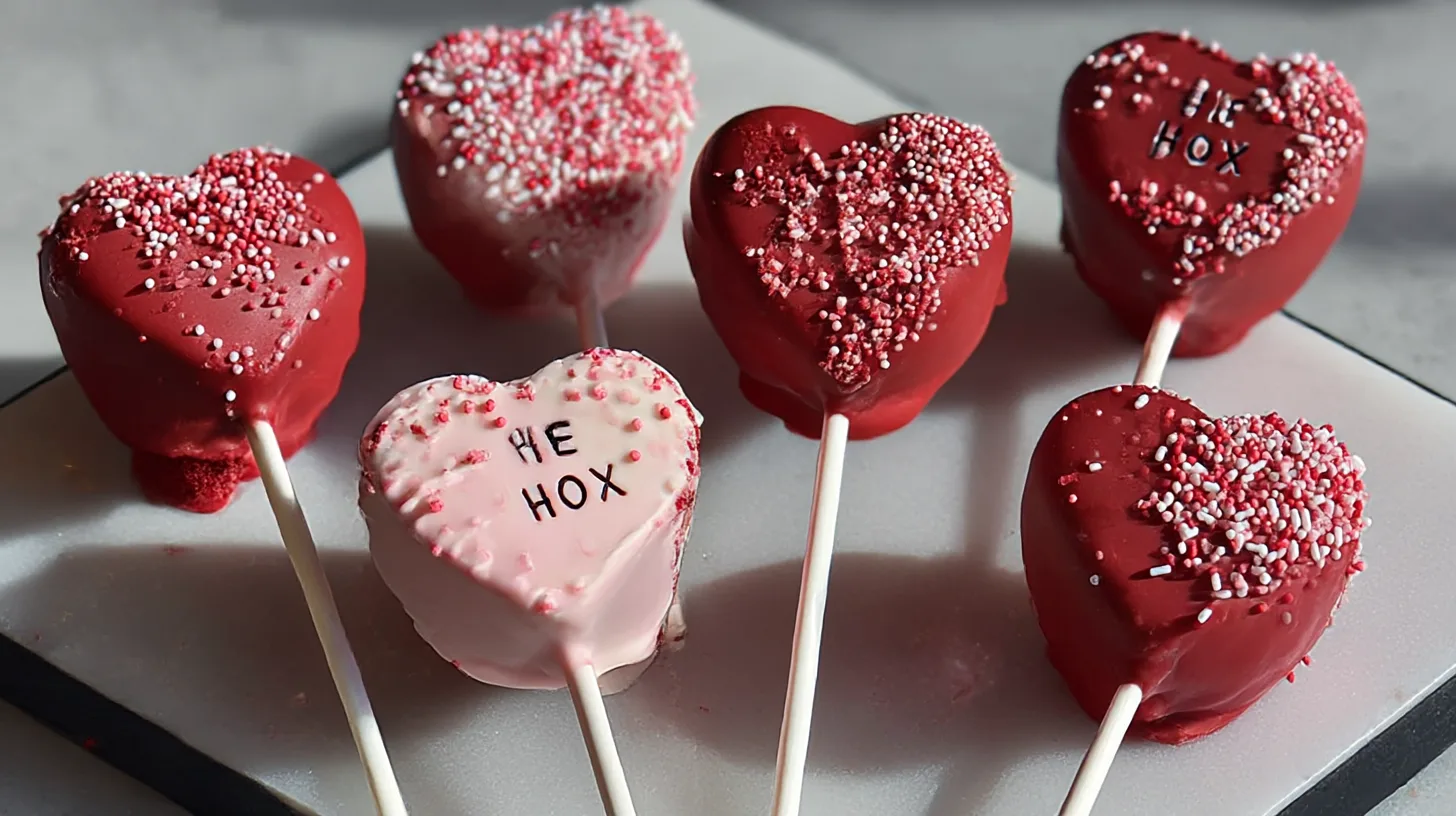
These heart-shaped Red Velvet Cake Pops are not just cute — they’re practical too! You’ll love how easy they are to shape and decorate, and how perfectly they hold together without becoming greasy. The creamy tang of the frosting balances the rich cocoa flavor, while the smooth candy coating gives each bite a beautiful finish.
They make stunning edible gifts, party desserts, or Valentine’s Day surprises. Plus, kids and adults alike can’t resist their bite-sized charm and soft, fudgy texture.
Ingredients
For the Cake
- 1 box Red Velvet Cake Mix – rich, velvety, and vibrant in color
- 1 cup Milk (or water/plant-based milk) – adds moisture and tenderness
- 3 Eggs – for structure and richness
For the Frosting
- 2 tbsp Unsalted Butter (softened) – gives creaminess
- ½ cup Cream Cheese (softened) – adds a subtle tang
- ½ cup Marshmallow Creme – sweetens and binds the mixture
(You can also substitute with 1 can of cream cheese frosting for convenience.)
For the Coating
- 24 oz Pink Candy Melts – smooth and glossy finish; perfect Valentine’s color
Directions
Step 1: Preheat and Prepare
Preheat your oven to 350°F. Line your baking pan with parchment paper or lightly spray it with baking spray. Let the butter and cream cheese soften at room temperature — they’ll mix more easily later.
Step 2: Mix the Cake Batter
In a large mixing bowl, combine the red velvet cake mix, milk, and eggs. Beat with a hand mixer on low for 30 seconds, then medium for 2 minutes. (Skip the oil listed on the cake box — you won’t need it for cake pops.)
Step 3: Bake the Cake
Pour the batter into your pan and bake as directed on the box. Once baked, test for doneness with a toothpick — it should come out clean or with a few crumbs.
Step 4: Crumble While Hot
While the cake is still warm, transfer it to a stand mixer or large bowl. Crumble it into fine crumbs using a fork, hand mixer, or paddle attachment. Warm cake crumbles more evenly and holds together better later.
Step 5: Make the Frosting
Add the softened butter, cream cheese, and marshmallow creme to the cake crumbs. Mix on medium speed until everything combines into a soft, dough-like texture that holds its shape when pressed.
Step 6: Shape the Hearts
Press small portions of the cake mixture firmly into each cavity of a heart-shaped cake pop mold. Insert wooden sticks into the center of each heart, pressing gently to secure.
Step 7: Set and Chill
If the sticks feel loose, dip their ends into a little melted candy melt before inserting them again this “glue” trick helps them stay in place. Arrange the cake pops on a parchment-lined tray and chill for 5 minutes in the freezer (or about an hour in the fridge).
Step 8: Dip and Decorate
Melt the candy melts in a microwave-safe bowl until smooth. Dip each heart-shaped cake pop into the melted coating, allowing excess to drip off. Place them on parchment paper to set.
Step 9: Add the Magic
Once the coating firms up, drizzle with extra melted chocolate or decorate with sprinkles, edible glitter, or tiny sugar hearts. You’ll have heart-shaped red velvet treats that look as good as they taste!
Cultural or Technique Note
These Heart-Shaped Red Velvet Cake Pops are a modern twist on classic Southern red velvet cake that smooth, cocoa-touched flavor paired with tangy frosting. Turning it into a cake pop makes it portable, fun, and perfect for holidays like Valentine’s Day or anniversaries.
Serving Suggestions
There are so many fun and creative ways to present these Heart-Shaped Red Velvet Cake Pops! Here are a few of my favorite ideas to inspire you:
- Arrange on a tray as heart-shaped cake pops on sticks for parties. Line them up neatly or stand them in a foam base so they look like a bouquet — it makes a stunning centerpiece for birthdays or Valentine’s gatherings.
- Gift them in clear cellophane bags tied with red or pink ribbons. Add a small note or tag for a personal touch — perfect for classroom exchanges, wedding favors, or sweet “thank-you” treats.
- Add to dessert platters beside chocolate-dipped strawberries. The color contrast looks gorgeous, and the mix of textures is irresistible.
- Serve as edible centerpieces for Valentine’s Day dinners. Arrange them in a glass vase or mason jar filled with sugar crystals or pink candy — it’s both a decoration and a dessert!
- Display them on a tiered dessert stand. If you’re hosting, they’ll instantly make your table look elegant and festive.
Pro Tips for Success
Make your heart-shaped Red Velvet Cake Pops turn out bakery-perfect every time with these practical tips:
- Skip the oil – When preparing the cake mix, don’t add oil as listed on the box. The frosting adds plenty of moisture later, and skipping oil helps your pops stay firm and shapeable.
- Crumble the cake while it’s still warm – Warm cake breaks down into soft crumbs more easily, giving a smooth and consistent texture.
- Use softened ingredients – Room-temperature butter and cream cheese mix evenly for silky frosting without lumps.
- Dip the sticks in melted candy first – This acts as edible glue and keeps your cake pops from sliding off the sticks.
- Don’t overchill – Too much time in the fridge or freezer can make your cake pops crack when dipped in warm coating. A quick 5-minute chill is just enough!
- Thin out thick melted chocolate with coconut oil – A teaspoon or two helps achieve a glossy, even coating.
- Decorate before the coating sets fully – Add sprinkles or glitter while the chocolate is still tacky so they stick perfectly.
- Work in batches – Keep half the cake pops chilled while you dip the rest so they stay firm but not frozen.
Common Mistakes to Avoid
Even the cutest cake pops can go wrong without a few precautions! Here’s what to watch out for:
Overmixing the frosting: Too much mixing can make the dough too soft, making it tricky to shape cleanly. Mix only until combined.
Skipping the stick-dip step: If you forget to dip sticks in melted candy before inserting, your cake pops may loosen and fall off during dipping.
Using cold cake: Cold cake is harder to crumble evenly, leaving lumps in your mixture. Crumble it while warm instead.
Overchilling before dipping: Cake pops that are too cold can make the candy coating crack as it sets.
Too thick coating: Melted chocolate that’s too thick can look clumpy. Stir in a bit of coconut oil for a smoother texture.
Not tapping off excess coating: Let the extra chocolate drip off gently before setting your pops down — it keeps the coating smooth and even.
Storage & Reheating
These Heart-Shaped Red Velvet Cake Pops store beautifully — which makes them great for prepping ahead!
- Fridge: Store in an airtight container for 3–4 days. Keep them upright if possible so the coating stays intact.
- Freezer: Freeze for up to 2 months. Wrap individually in plastic wrap and place in a freezer-safe bag or box. Thaw overnight in the fridge before serving.
- Room Temperature: If your kitchen is cool, you can keep them on the counter for a day or two.
- Reheat: Not needed! Enjoy your cake pops at room temperature — that’s when their texture and flavor shine the most.
Frequently Asked Questions
Q: Can I use a different shape mold?
: Absolutely! While heart-shaped molds are perfect for Valentine’s Day, you can use stars, flowers, or circles for birthdays, baby showers, or any celebration.
Q: Can I make these without a mold?: Yes! Simply roll the cake mixture into small, even balls by hand. Insert sticks, chill briefly, and then dip just as you would with shaped pops.
Q: Can I use white chocolate instead of candy melts?
: Definitely. Just melt it slowly and stir often, since white chocolate can burn or seize easily. Add a small spoon of coconut oil to keep it silky smooth.
Q: How do I get a smooth coating?
: Chill your cake pops until firm but not frozen. Dip, gently tap off extra coating, and let them dry upright for the smoothest finish.
Q: How can I decorate them for special occasions?
: Try pink drizzle for Valentine’s, edible gold dust for anniversaries, or pastel sprinkles for spring parties. You can match them to any theme!
Closing Paragraph
These Heart-Shaped Red Velvet Cake Pops are the kind of treat that turns simple moments into sweet celebrations. Whether you’re baking them for a special someone or just for fun, they’re guaranteed to bring smiles and sparkle to your table. Have fun decorating them and don’t forget to share your creations — love tastes even sweeter when shared.
Final Thoughts
Every time I make these Red Velvet Cake Pops, I’m reminded that the smallest treats often hold the biggest joy. There’s something so satisfying about creating something this beautiful and delicious with your own hands. I hope they bring a little extra love to your kitchen — and your heart.

Heart-Shaped Red Velvet Cake Pops
Equipment
- Cake pop mold (heart-shaped)
- Mixing Bowl
- Hand Mixer or Stand Mixer
- Baking Pan
- Parchment Paper
- Lollipop sticks
Ingredients
For the Cake
- 1 box red velvet cake mix
- 1 cup milk or water or plant-based milk
- 3 eggs
For the Frosting
- 2 tbsp unsalted butter softened
- 1/2 cup cream cheese softened
- 1/2 cup marshmallow creme
For the Coating
- 24 oz pink candy melts
Instructions
- Preheat oven to 350°F and prepare a baking pan with parchment or baking spray. Let butter and cream cheese soften.
- Mix the cake batter: In a large bowl, beat red velvet cake mix, milk, and eggs for 2 minutes. Do not add oil.
- Bake the cake according to box directions. Check doneness with a toothpick.
- While still warm, crumble the cake into fine crumbs using a fork or mixer.
- Make the frosting: Mix butter, cream cheese, and marshmallow creme with cake crumbs until a dough forms.
- Shape into hearts using a cake pop mold. Insert sticks into centers of each heart-shaped pop.
- Chill pops on a tray for 5 minutes in freezer or 1 hour in fridge to firm up.
- Melt pink candy melts in the microwave until smooth. Dip each pop and let excess drip off.
- Set pops on parchment paper and decorate with sprinkles or drizzle before coating sets.