
After a long day, there’s something comforting about preparing dinner with a simple yet satisfying recipe. This dish is perfect for weeknight meals or an easy weekend family gathering. The combination of tender chicken thighs enveloped in a creamy, garlic-Parmesan paste makes it a delightful option for gatherings or quiet moments at home. With its straightforward preparation, this recipe invites you into a world of cozy, homemade comfort.
Why You’ll Love This Creamy Garlic Parmesan Chicken
This recipe stands out for its ease and reliability, making it a go-to choice for busy weeknights. The balance of flavors from the garlic and Parmesan contributes to a comforting experience that suits everyday dining. The creamy texture of the chicken when baked creates a satisfying dish that nourishes without overwhelming. Whether it’s your first time or you’re returning for more, this dish embodies a comforting familiarity.
Kitchen Tools You’ll Need
- Medium bowl
- Small bowl
- Baking dish
- Wooden skewers
- Whisk
- Knife
- Cutting board
- Tongs (optional)
Ingredients
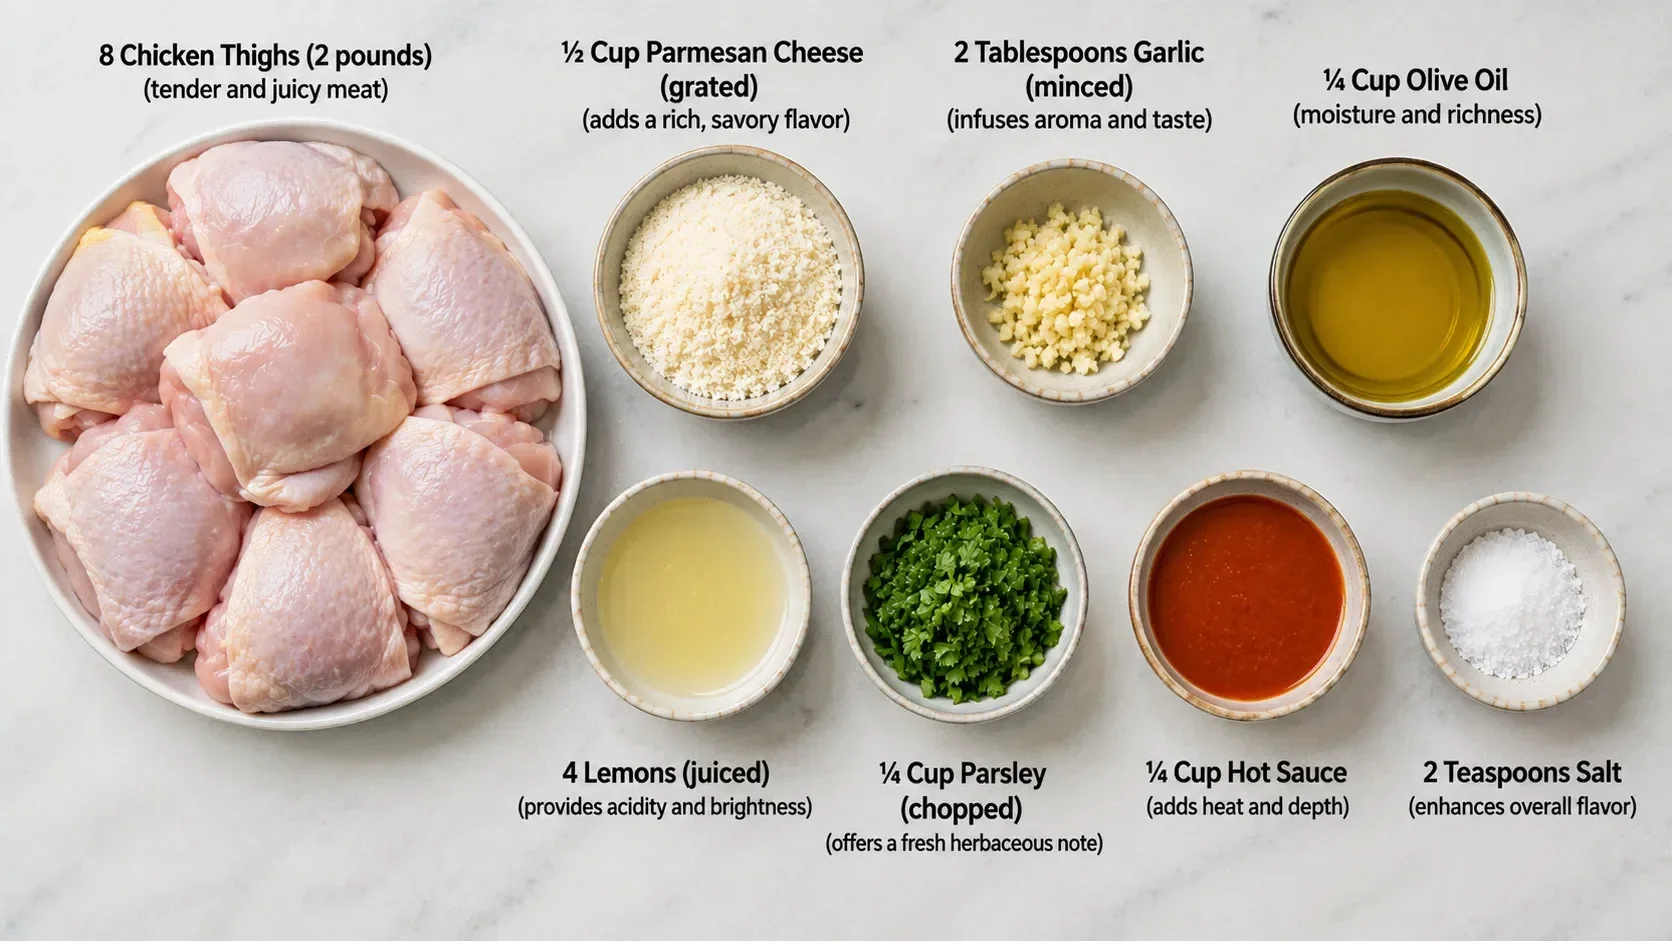
- 8 Chicken Thighs (2 pounds) (tender and juicy meat)
- ½ Cup Parmesan Cheese (grated) (adds a rich, savory flavor)
- 2 Tablespoons Garlic (minced) (infuses aroma and taste)
- ¼ Cup Olive Oil (moisture and richness)
- 4 Lemons (juiced) (provides acidity and brightness)
- ¼ Cup Parsley (chopped) (offers a fresh herbaceous note)
- ¼ Cup Hot Sauce (adds heat and depth)
- 2 Teaspoons Salt (enhances overall flavor)
How to Make Creamy Garlic Parmesan Chicken
Step 1. In a medium mixing bowl, whisk together the lemon juice, chopped parsley, hot sauce, and salt. The whisking process helps to combine these ingredients into a cohesive marinade that infuses the chicken with flavor while also providing a tangy kick from the lemon and hot sauce. You’re looking for a smooth mixture with all components well incorporated.
Step 2. Pat the chicken thighs dry with paper towels to remove excess moisture. This step is important as it helps the marinade stick better and promotes even cooking. Next, cut each chicken thigh into 2-3 smaller pieces. This will allow for more surface area to absorb the marinade, enhancing flavor.
Step 3. Toss the chicken pieces in the marinade thoroughly, ensuring they are well coated. Cover the bowl and refrigerate the marinated chicken for 30-120 minutes. This marinating step increases flavor penetration, allowing the chicken to soak up the tangy, spicy notes. The longer it marinates, the more pronounced the flavor becomes, but even a shorter time will yield satisfying results.
Step 4. While the chicken marinates, soak your wooden skewers in water for 30 minutes. This soaking prevents them from burning during the cooking process. It’s a small yet necessary step that ensures your skewers hold up throughout baking and broiling, leading to a better overall presentation and cooking experience.
Step 5. In a small bowl, mix together the grated Parmesan cheese, minced garlic, and olive oil until it forms a thick paste. This mixture will create a creamy coating for the chicken, adding richness and depth of flavor. Keep an eye on achieving a smooth consistency that easily holds together.
Step 6. Preheat your oven to 400°F. After marinating, pat the chicken pieces dry again to remove any excess liquid. This action ensures that the chicken gets a nice browning without steaming in the oven, contributing to better texture and flavor as it cooks.
Step 7. Thread the chicken pieces onto the soaked skewers, packing them snugly but not too tightly; this allows for even cooking. Place the skewers in a baking dish, making sure to arrange them in a single layer for even heat exposure. It’s important to utilize a dish that can catch any drippings to keep the oven clean.
Step 8. Bake the skewers in the preheated oven for about 15 minutes. The chicken should be just starting to cook through at this point, so keep an eye on its color. A slight change to a golden hue indicates that it’s ready for the next step.
Step 9. After baking, remove the chicken from the oven and generously coat each piece with the garlic Parmesan paste. Ensure all sides are covered to maximize flavor. This paste will form a deliciously crispy layer once broiled.
Step 10. Broil the chicken on high for 10 minutes, flipping them halfway through. This step helps achieve a nicely browned exterior while ensuring the chicken is fully cooked through. You’re aiming for a golden, slightly crispy outside, which provides a delightful contrast to the moist chicken inside.
Step 11. Once finished, allow the chicken to rest for about 5 minutes before serving. This resting period helps the juices redistribute, ensuring each bite remains tender and juicy. It’s a necessary step that enhances the overall eating experience.

Serving Suggestions
Creamy Garlic Parmesan Chicken makes for a great main dish any night of the week. Serve it for a family dinner alongside roasted vegetables or a light salad for balance. These skewers also work well as an appetizer at gatherings, offering a tasty option for guests. If you find yourself with leftovers, they can be enjoyed cold or lightly reheated, making them perfect for quick lunches or snacks throughout the week.
Pro Tips for Best Results
- Marination Time: A longer marination will enhance the flavor but even 30 minutes can make a difference.
- Dry Chicken: Always pat the chicken dry to promote better browning.
- Serve Immediately: Enjoying the chicken right after cooking ensures the best texture and taste.
- Adjust Broiling Time: Keep a close watch during broiling, as oven temperatures can vary.
- Use Fresh Garlic: Fresh minced garlic provides a more robust flavor profile than jarred options.
- Thigh Thickness: Uniform chicken pieces help them cook evenly, so try to cut similar sizes.
Common Mistakes to Avoid
- Skipping Marination: Not allowing time for the chicken to soak in flavors can lead to bland results. Always include marination for better taste.
- Dry Chicken Skewers: Forgetting to soak wooden skewers can cause them to burn during cooking. Ensure they are submerged in water for at least 30 minutes ahead of time.
- Overcrowding the Dish: Packing chicken too tightly on skewers can prevent even cooking. Just a single layer allows heat to circulate properly.
- Neglecting to Pat Dry: Not drying the chicken after marination can result in steaming instead of browning. Always remove excess moisture before cooking.
- Wrong Broiling Position: Placing the chicken too far from the heat source might lead to undercooked results. Position it close but be cautious to not burn.
- Rushing Resting Time: Cutting into the chicken too soon can cause juices to escape. Allowing it to rest for a few minutes is essential for juicy bites.
Variations & Substitutions
For a slightly different taste, try adding a bit of Italian seasoning to the garlic Parmesan mixture or using fresh herbs like thyme or basil. If you prefer a lighter option, consider using skinless chicken thighs. Adjust the level of hot sauce according to your preference for spiciness.
Storage & Reheating
Store any leftover chicken at room temperature for up to two hours after cooking. In the refrigerator, it can last for about 3-4 days. To maintain its texture, reheat in the oven at a low temperature to preserve moisture and avoid drying out. Freezing is also an option for longer storage; the chicken can be kept in an airtight container for up to three months. Allow it to thaw in the refrigerator overnight before reheating.
Frequently Asked Questions
Can I make this recipe ahead of time?
Yes, you can prepare the chicken and marinate it a day in advance. Just make sure to allow it to come to room temperature before cooking.
How long does it last in the fridge?
Cooked chicken can be stored in the refrigerator for 3-4 days. Ensure it is in an airtight container to maintain freshness.
Can I freeze this recipe?
Absolutely! Cooked chicken can be frozen for up to three months. Just place it in an airtight container or freezer bag to prevent freezer burn.
What can I substitute for one ingredient?
If you need to substitute the hot sauce, consider using a milder sauce or lemon pepper seasoning for a different flavor profile.
Why didn’t my recipe turn out as expected?
Common issues may stem from not marinating long enough or overcrowding the baking dish, which can affect cooking and flavor. Ensure each step is carefully followed for the best results.
Final Thoughts
Making Creamy Garlic Parmesan Chicken can turn a regular evening into something special with minimal effort. The combination of flavors and ease of preparation makes this dish enjoyable to create and share. With its welcoming aroma and satisfying texture, it invites all to gather around the table. Enjoy the process, and trust that this recipe will deliver a comforting meal every time you make it.

Creamy Garlic Parmesan Chicken
Ingredients
For the Chicken
- 8 pieces Chicken Thighs 2 pounds, tender and juicy meat
- 4 pieces Lemons juiced, provides acidity and brightness
- 2 tablespoons Garlic minced, infuses aroma and taste
- ¼ cup Olive Oil moisture and richness
- ¼ cup Hot Sauce adds heat and depth
- 2 teaspoons Salt enhances overall flavor
For the Coating
- ½ cup Parmesan Cheese grated, adds a rich, savory flavor
For Garnish
- ¼ cup Parsley chopped, offers a fresh herbaceous note
Instructions
Preparation
- In a medium mixing bowl, whisk together the lemon juice, chopped parsley, hot sauce, and salt until smooth.
- Pat the chicken thighs dry with paper towels. Cut each thigh into 2-3 smaller pieces.
- Toss the chicken pieces in the marinade and cover the bowl. Refrigerate for 30-120 minutes.
- Soak wooden skewers in water for 30 minutes.
- In a small bowl, mix together the grated Parmesan cheese, minced garlic, and olive oil until a thick paste forms.
Cooking
- Preheat the oven to 400°F (204°C). Pat the marinated chicken pieces dry again.
- Thread the chicken pieces onto the soaked skewers and place them in a baking dish.
- Bake the skewers for about 15 minutes.
- Remove from the oven and coat each piece with the garlic Parmesan paste.
- Broil the chicken on high for 10 minutes, flipping halfway through.
- Allow the chicken to rest for about 5 minutes before serving.