Hi, I’m Laura. I’m 40 years old and living in the United States, and my journey with cooking has been a mix of curiosity, trial and error, and a lot of laughter with a close friend.
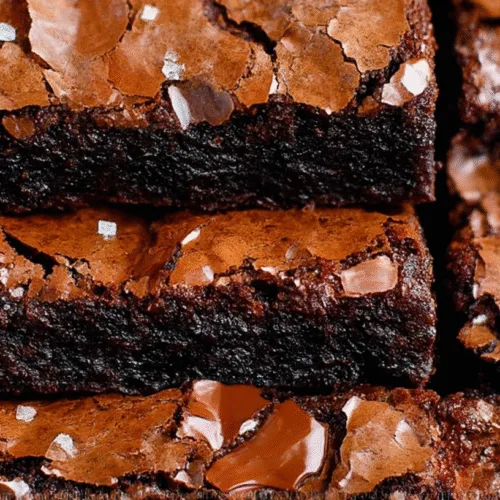
I discovered the best cocoa fudge brownies recipe tucked inside an old, worn cookbook — pages soft and marked with little handwritten notes. Baking it again filled my kitchen with that same nostalgic, chocolatey warmth I once knew.
Try it and tell me — did it bring back old memories too?
Why You’ll Love This the best cocoa fudge brownies
These brownies are the perfect mix of comfort and indulgence. They’re rich but not overwhelming, sweet but perfectly balanced, and best of all — they start from a simple box mix, so anyone can make them. No fancy steps or long prep time required!
They’re also endlessly customizable. Whether you like dark, milk, or semi-sweet chocolate, or even a sprinkle of sea salt on top, this recipe adapts easily to your taste. It’s cozy, crowd-pleasing, and always a hit at parties, holidays, or late-night sweet cravings.
Ingredients
- 1 box brownie mix – your favorite base; choose fudgy for that dense, rich texture.
- 1/4 cup water – brings the batter together and keeps it moist.
- 1/2 cup vegetable oil – adds richness and that glossy brownie sheen.
- 2 whole eggs – help bind everything while keeping it chewy and soft.
- 1/2 can sweetened condensed milk – the secret ingredient for gooey sweetness.
- 1/2 bag milk chocolate chips – melt into the topping for an extra fudgy layer.
Directions
- Prepare the brownies
Mix your brownie batter according to the box instructions — just water, oil, and eggs. Stir until combined but don’t overmix; a few lumps keep the texture tender. - Bake to perfection
Pour the batter into your favorite 9×13 glass pan and bake until a toothpick comes out clean. Your kitchen will smell like rich cocoa fudge heaven. - Poke the brownies
As soon as they’re out of the oven, use a knife to poke small holes all over the top. This is where the magic happens — those holes let all the sweetness soak in. - Pour the condensed milk
While the brownies are still hot, drizzle half a can of sweetened condensed milk evenly across the top. Gently spread it out with a spatula so it seeps into every little crevice. - Add chocolate chips
Sprinkle half a bag of milk chocolate chips on top while everything is warm. They’ll melt just slightly, creating a shiny, silky top layer that hardens beautifully as it cools. - Let them rest
No need to bake again — just let your brownies cool completely. The condensed milk will thicken, the chocolate chips will set, and you’ll have the most luscious, gooey texture imaginable.
Cultural or Technique Note
These brownies are inspired by the classic Southern “poke cake” tradition — where warm cakes are poked and drenched with sweet sauces for an extra-moist, flavorful bite. It’s a technique rooted in homey American baking, known for transforming simple boxed mixes into something truly indulgent and personal.
More Serving Suggestions
If you want to take your best cocoa fudge brownies to the next level, there are so many delicious ways to enjoy them:
- Brownie Sundae Bar: Cut brownies into bite-sized squares and serve with bowls of ice cream, caramel, hot fudge, nuts, and whipped cream for a fun dessert night.
- Holiday Dessert Platter: Arrange brownie squares with cookies, fudge, and truffles for a stunning, festive dessert tray.
- Layered Dessert Cups: Crumble brownies into glass jars with layers of whipped cream, chocolate pudding, or fruit for an easy, no-bake parfait.
- Frosted Treat: Spread a thin layer of chocolate ganache or peanut butter frosting on top for an extra indulgent version.
- Gift Idea: Wrap individual brownie squares in parchment and tie with twine — they make the perfect homemade gift during the holidays.
More Pro Tips for Success
- Use room temperature eggs — they mix better and give smoother batter.
- Add a pinch of espresso powder — it deepens the chocolate flavor without tasting like coffee.
- Don’t skip resting time — brownies set as they cool, locking in their fudgy texture.
- For extra crunch, sprinkle crushed nuts or toffee bits on top before cooling.
- To cut cleanly, use a warm knife and wipe it between slices.
- Want shiny tops? Beat the batter a few extra strokes once combined to aerate slightly — this helps form that glossy crackly crust.
More Common Mistakes to Avoid
- Using cold eggs or ingredients: This can make your batter thick and uneven — always use room temperature items.
- Overmixing: Too much mixing can create tough brownies; stir just until combined.
- Skipping pan prep: Without parchment or a greased pan, brownies can stick and break apart.
- Rushing cooling time: Brownies taste best once they’ve fully cooled and set — resist cutting too soon!
- Not storing properly: Exposure to air dries them out quickly; always store in a sealed container.
Extended Storage & Reheating Tips
- Room Temperature: If your kitchen is cool, you can store brownies covered on the counter for up to 2 days.
- Refrigerator: Place in an airtight container with parchment paper between layers to prevent sticking.
- Freezer: For longer storage, wrap brownies individually in plastic wrap, then place in a freezer-safe bag. Thaw at room temperature before serving.
- Microwave Reheating: Heat for 10–15 seconds for a fresh-from-the-oven softness.
- Oven Reheating: Warm at 300°F for 5 minutes; this keeps the edges chewy and the center gooey.
Additional Frequently Asked Questions
Q4: Can I make these brownies ahead of time?
Definitely! They stay moist and delicious for several days. You can bake them the night before and store them covered until you’re ready to serve.
Q5: How do I make them less sweet?
: Use dark chocolate brownie mix and semi-sweet or bittersweet chips instead of milk chocolate. You can also drizzle less condensed milk if you prefer a milder sweetness.
Q6: Can I add mix-ins to the batter?
: Yes! Try chopped nuts, shredded coconut, crushed cookies, or even peanut butter swirls for a fun twist.
Q7: How do I know when the brownies are done baking?
: Insert a toothpick near the center — it should come out with just a few moist crumbs (not wet batter). Remember, they’ll firm up as they cool.
Q8: Can I make these gluten-free?
Absolutely. Just use a gluten-free brownie mix and check that your chocolate chips and condensed milk are gluten-free as well.
Closing Paragraph
These best cocoa fudge brownies are proof that a simple box mix can turn into something extraordinary with a few clever tweaks. They’re gooey, chocolatey, and totally addictive — perfect for holidays, bake sales, or just because you deserve a treat. Bake a batch, share them with friends, and watch them disappear in minutes!
Final Thoughts
Every time I make these brownies, I think of my Mawmaw’s kitchen — the smell of melting chocolate, the laughter of family waiting impatiently for dessert, and that first fudgy bite that feels like home. I hope you find the same comfort in these brownies that I do. Follow me on Pinterest for more cozy, quick, and nostalgic recipes.
Best Cocoa Fudge Brownies (Box Mix Upgrade)
Equipment
- 9×13-inch Glass Baking Dish
- Mixing Bowl
- Spatula
- Toothpick or Knife
Ingredients
Main Ingredients
- 1 box brownie mix your favorite fudgy variety
- 0.25 cup water
- 0.5 cup vegetable oil
- 2 eggs
- 0.5 can sweetened condensed milk about 7 oz / 200g
- 0.5 bag milk chocolate chips about 6 oz / 170g
Instructions
- Preheat your oven to the temperature listed on the brownie box (typically 350°F/175°C). Grease or line a 9×13 baking dish.
- In a mixing bowl, prepare the brownie batter by combining the boxed mix with water, oil, and eggs. Stir just until combined — avoid overmixing.
- Pour the batter into the prepared pan and smooth the top. Bake according to box instructions (typically 22–28 minutes), until a toothpick comes out clean.
- Remove from oven and, while still hot, poke small holes across the surface using a knife or toothpick.
- Immediately drizzle sweetened condensed milk over the warm brownies. Spread gently with a spatula to ensure it seeps into the holes.
- Sprinkle milk chocolate chips over the top. Let them sit and melt slightly, then cool completely for about 1 hour until set.
- Once fully cooled, cut into squares and serve. Store leftovers in an airtight container.