Creating a comforting dish can truly elevate a weekday dinner or weekend gathering. Picture crispy, tender chicken strips coated in crunchy crumbs, paired with a delightful sauce that adds just the right touch of sweetness and spice. This recipe brings together delicious flavors and simple preparation, making it ideal for casual meals or satisfying snacks during quiet moments at home. It’s designed to be an easy go-to dish, inviting anyone into the kitchen to enjoy the cooking process.
Why You’ll Love This Thai Sticky Chicken Fingers
This recipe offers a straightforward approach to making a comforting meal that’s not only easy to prepare but also full of balanced flavors. The chicken fingers are crispy on the outside, juicy on the inside, and paired beautifully with a mildly sweet and tangy sauce. Flexibility shines through in how you can serve them, whether for busy weeknight dinners or laid-back family lunches. This is your chance to create something delightful that everyone will appreciate.
Kitchen Tools You’ll Need
- Two half-sheet pans
- Parchment paper or foil
- Shallow dishes for breading
- Food processor
- Large Ziplock bag
- Whisk
Ingredients
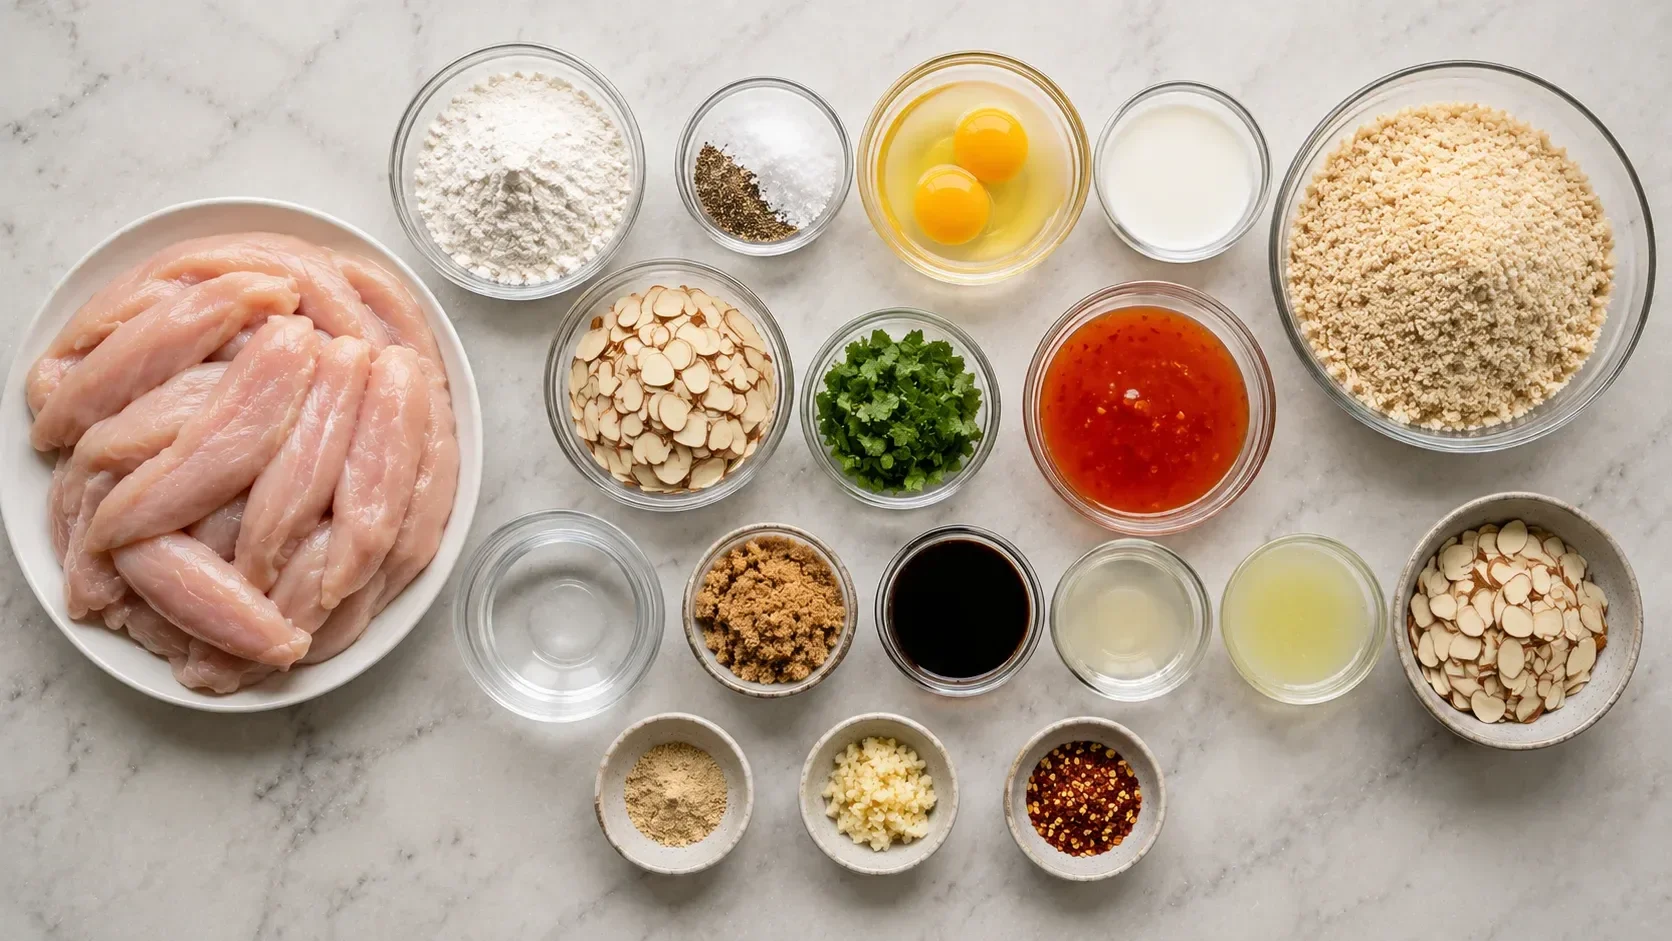
- 1-3/4 lbs chicken breasts, cut into 1” thick strips
- 1/2 cup gluten-free flour, or AP flour if not GF
- Salt and pepper
- 2 eggs
- 2 Tablespoons milk, any kind
- 4 cups gluten-free Rice Chex pulverized into 2 cups crumbs OR 2 cups gluten-free bread crumbs
- 3/4 cup sliced almonds, divided
- 1/4 cup cilantro, chopped
- 1/2 cup sweet chili sauce
- 1/2 cup water
- 1/4 cup brown sugar
- 1/4 cup gluten-free reduced-sodium Tamari or soy sauce if not GF
- 2 Tablespoons rice vinegar
- 2 Tablespoons fresh lime juice
- 1/2 teaspoon ground ginger
- 1 clove garlic, pressed or minced
- 1/4 teaspoon red chili pepper flakes
How to Make Thai Sticky Chicken Fingers
Step 1. To start, prepare your baking sheets by lining two half-sheet pans with parchment paper or foil. This will help with easy cleanup later. Once lined, spray them generously with nonstick spray to prevent any sticking as the chicken cooks.
Step 2. In a shallow dish, whisk together the eggs and milk until combined. This mixture will help the breading stick to the chicken. Make sure the mixture is smooth and well blended, as any lumps could affect the battering process.
Step 3. In another shallow dish, process 1/2 cup of the sliced almonds in a food processor until they turn into fine crumbs. Once processed, pour the almond crumbs into the dish you’ve set aside for the breading.
Step 4. Next, process the Rice Chex or gluten-free bread crumbs into fine crumbs if using the cereal. Mix the crumbs with the previously processed almond crumbs, and season this mixture with salt and pepper. These will give the chicken a flavorful and crunchy coating.
Step 5. In a large Ziplock bag, combine the gluten-free flour, 3/4 teaspoon salt, and 1/2 teaspoon pepper. This seasoned flour will serve as the first layer of coating for the chicken, helping the other layers stick. Allow the mixture to combine well inside the bag.
Step 6. Add the chicken strips to the bag and shake vigorously. As the flour coats the chicken, you can let them sit for a moment to ensure they have a thin layer of flour without any clumps, then shake off any excess flour.
Step 7. After the flour layer, dip each chicken piece into the egg and milk mixture. Make sure they’re well coated to achieve good adhesion for the crumb layer that follows.
Step 8. Now, roll the chicken fingers in the almond and crumb mixture, pressing gently to ensure that the coating sticks well. This gives each piece a nice, crunchy surface once baked.
Step 9. Place the breaded chicken strips in the refrigerator for 20-30 minutes. Chilling helps the coating adhere better during cooking, leading to crispier chicken strips.
Step 10. Preheat your oven to 425 degrees F. While the oven is heating, remove the chicken from the refrigerator. Make sure each piece is still well-coated, as this temperature will ensure they cook evenly and become crispy.
Step 11. Lightly spray the tops of the chicken fingers with olive oil or nonstick spray. This step is vital for achieving a golden brown finish.
Step 12. Bake the chicken fingers in the preheated oven for 10 minutes. At this point, they should start to firm up and turn golden at the edges, indicating they’re on their way to being perfectly cooked.
Step 13. Carefully flip the chicken fingers over and spray them lightly again. Return them to the oven and bake for an additional 7-9 minutes. Watch for a light golden color and a firm texture; they’ll be done when they are cooked through.
Step 14. To prepare the sauce, combine the sweet chili sauce, water, brown sugar, Tamari or soy sauce, rice vinegar, lime juice, ground ginger, pressed garlic, and red chili pepper flakes in a saucepan. Bring this mixture to a gentle simmer.
Step 15. Allow the sauce to reduce for 5-6 minutes. You’ll know it’s ready once it thickens slightly and the flavors meld together, creating a cohesive and aromatic sauce.
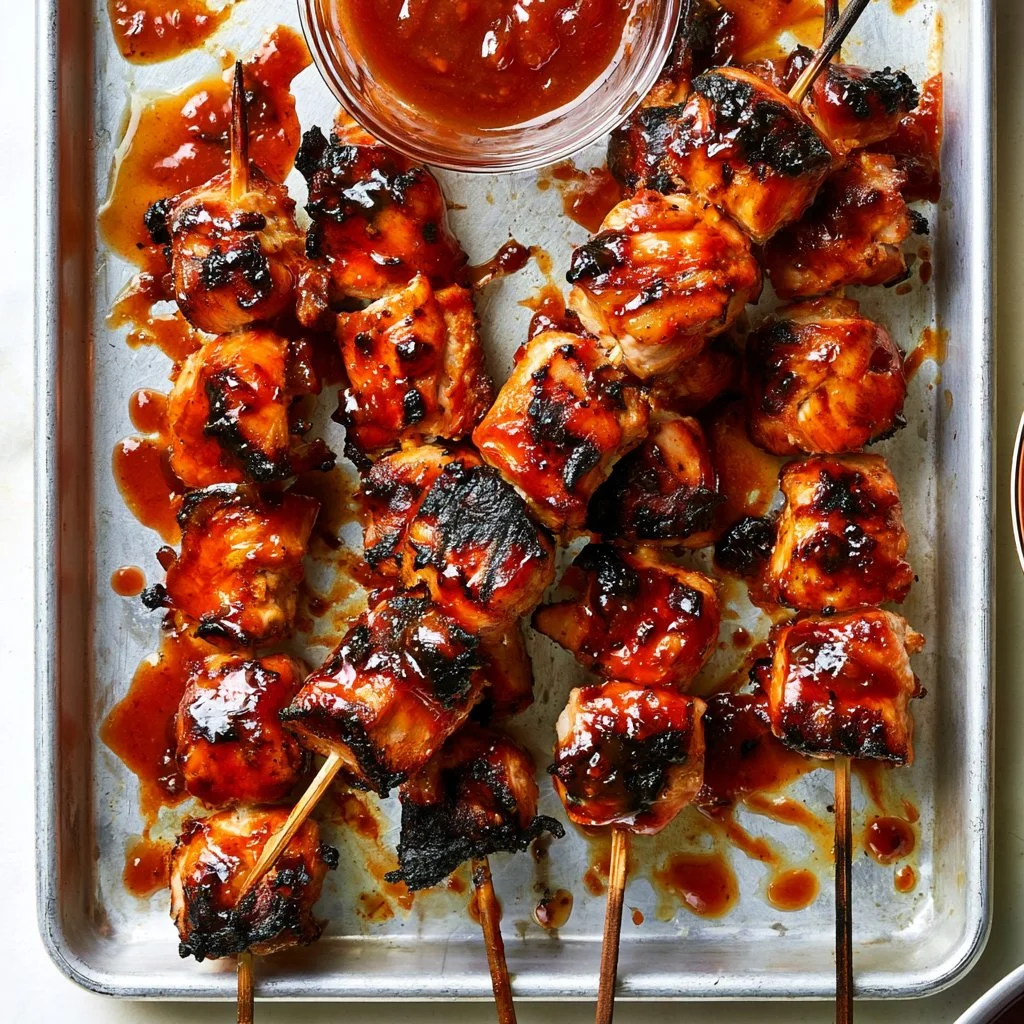
Step 16. Dunk the baked chicken fingers into the sauce, ensuring they are well coated. This adds a layer of flavor that is essential for the dish and gives that sticky feel.
Step 17. Finally, place the coated chicken back onto the baking sheets and bake for an additional 4-5 minutes. This will help the sauce adhere to the chicken.
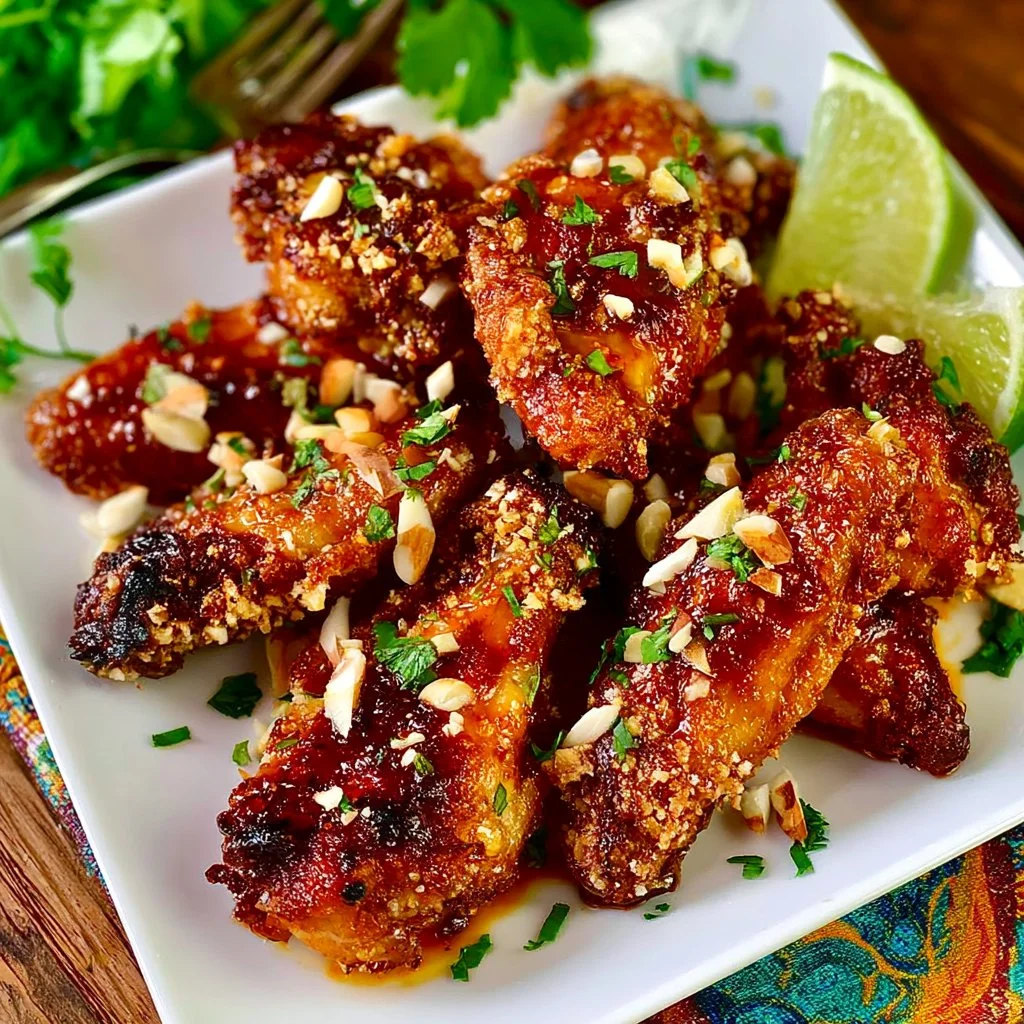
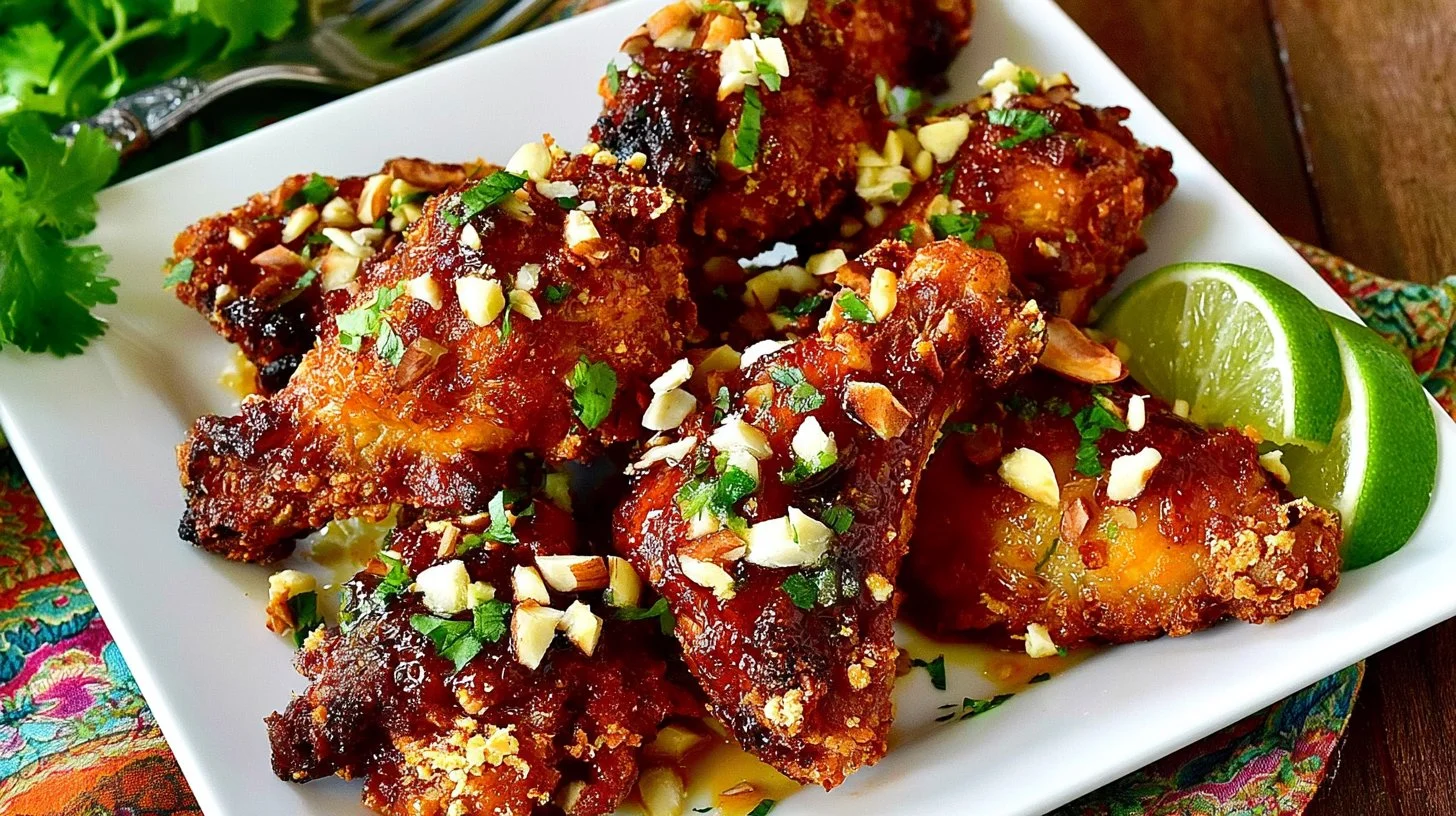
Step 18. Serve the chicken fingers topped with the remaining sliced almonds and chopped cilantro for added crunch and freshness.
Serving Suggestions
These crispy chicken fingers can be enjoyed in many ways. They make for a delightful lunch or dinner addition, served with a simple side salad or steamed rice. They also work well as a snack for gatherings, where everyone can enjoy them as finger food. Leftovers can be a quick breakfast option, thrown into a wrap or enjoyed cold. Their versatility makes them easy to include in a variety of meals throughout the week.
Pro Tips for Best Results
- Make sure to coat the chicken thoroughly at each step to achieve the best crispiness.
- Allow the coated chicken to chill; this helps the breading stay in place better.
- For more flavor, let the sauce simmer longer to deepen the taste.
- Use a timer to manage cooking times, ensuring even baking.
- When flipping the chicken, use tongs to keep the coating intact.
- Keep an eye on the chicken in the last baking phase to ensure it doesn’t overcook.
Common Mistakes to Avoid
- Not drying the chicken: If the chicken is wet, the breading may not stick well, leading to a less crispy texture. Pat chicken dry before dredging.
- Skipping the chill time: Neglecting to refrigerate the coated chicken can cause the breading to fall off during cooking. Be sure to allow time for chilling.
- Overcrowding the pan: If the chicken pieces are too close together, they’ll steam instead of bake, resulting in soggy breading. Give each piece space to cook evenly.
- Insufficient oil spray: Not spraying the tops of the chicken can lead to uneven browning. A light spray before baking encourages a crispier finish.
- Not checking for doneness: Cooking times can vary, so use a meat thermometer to check for an internal temperature of 165°F to ensure they are fully cooked.
- Using stale crumbs: Older bread crumbs or crumbs that aren’t fresh may not provide the desired crispiness. Make your crumbs just before use or check the freshness of store-bought ones.
Variations & Substitutions
You can customize this recipe by adjusting the spice level; consider adding more or fewer red chili flakes according to your preference. If you want a different texture, try using corn flakes instead of Rice Chex for the coating. For a similar sauce, experiment with different vinegars or citrus juice. If you have leftover nuts, other nuts like walnuts or pecans could replace almonds. Play with fresh herbs for added flavor, using parsley in place of cilantro if desired.
Storage & Reheating
Store any leftover chicken fingers in an airtight container at room temperature for up to a few hours. For longer storage, keep them in the refrigerator, where they will last for about 3 days. Freezing is also an option; place them in a freezer-safe container, and they’ll keep for up to a month. To reheat, it’s best to use an oven set at 350°F to help restore their crisp texture, heating for around 10-15 minutes until warmed through.
Frequently Asked Questions
Can I make this recipe ahead of time?
Yes, it’s possible to prepare the chicken fingers ahead of time. You can bread the chicken and refrigerate it for a few hours or overnight. Just remember to bake them fresh before serving for the best texture.
How long does it last in the fridge?
Cooked chicken fingers will last for 3 days in the refrigerator when stored properly in an airtight container. They’re best enjoyed fresh, but leftovers can be a convenient snack.
Can I freeze this recipe?
Yes, you can freeze the chicken fingers. After baking, ensure they are cooled completely before placing them in a freezer-safe container. They can last for up to a month if stored properly in the freezer.
What can I substitute for one ingredient?
If you don’t have sweet chili sauce, consider mixing equal parts of a tangy sauce like barbecue with a touch of honey for a sweet alternative.
Why didn’t my recipe turn out as expected?
Common reasons might include insufficient chilling time for the breaded chicken or overcrowding on the baking sheets, which can cause steaming instead of browning. Make sure to follow the steps carefully for the best results.
Final Thoughts
Making these Thai Sticky Chicken Fingers is a straightforward and satisfying process that invites creativity and adaptability. As you gather the ingredients, you’ll appreciate the blend of textures and flavors as they come together. Enjoying this dish can become a highlight of your meal, bringing warmth and comfort to any occasion. Don’t hesitate to explore and make it your own, knowing each bite is a reminder of simple, homemade goodness.
Thai Sticky Chicken Fingers
Ingredients
Chicken Coating
- 1.75 lbs chicken breasts, cut into 1” thick strips
- 1/2 cup gluten-free flour or AP flour Use AP flour if not gluten-free.
- Salt and pepper Salt and pepper To taste
- 2 eggs
- 2 Tablespoons milk, any kind Use any milk you prefer.
- 4 cups gluten-free Rice Chex, pulverized into 2 cups crumbs, OR 2 cups gluten-free bread crumbs
- 3/4 cup sliced almonds, divided
Sauce
- 1/2 cup sweet chili sauce
- 1/2 cup water
- 1/4 cup brown sugar
- 1/4 cup gluten-free reduced-sodium Tamari or soy sauce Use soy sauce if not gluten-free.
- 2 Tablespoons rice vinegar
- 2 Tablespoons fresh lime juice
- 1/2 teaspoon ground ginger
- 1 clove garlic, pressed or minced
- 1/4 teaspoon red chili pepper flakes
- 1/4 cup cilantro, chopped For garnish, optional.
Instructions
Preparation
- Prepare your baking sheets by lining two half-sheet pans with parchment paper or foil and spray them generously with nonstick spray.
- In a shallow dish, whisk together the eggs and milk until combined.
- Process 1/2 cup of the sliced almonds in a food processor until they turn into fine crumbs.
- Process the Rice Chex or gluten-free bread crumbs into fine crumbs if necessary.
- Combine the gluten-free flour, 3/4 teaspoon salt, and 1/2 teaspoon pepper in a large Ziplock bag.
- Add the chicken strips to the bag, shake vigorously to coat with the flour, and let sit for a moment before shaking off excess flour.
Breading
- Dip each chicken piece into the egg and milk mixture, ensuring they are well coated.
- Roll the chicken fingers in the almond and crumb mixture, pressing gently to ensure the coating sticks.
- Place the breaded chicken strips in the refrigerator for 20-30 minutes to help adhere the coating.
Cooking
- Preheat your oven to 425 degrees F.
- Spray the tops of the chicken fingers lightly with olive oil or nonstick spray.
- Bake for 10 minutes, flip the chicken fingers, spray lightly again, and return to the oven for 7-9 minutes.
- Meanwhile, prepare the sauce by combining sweet chili sauce, water, brown sugar, Tamari or soy sauce, rice vinegar, lime juice, ground ginger, pressed garlic, and red chili pepper flakes in a saucepan and bring to a gentle simmer.
- Allow the sauce to reduce for 5-6 minutes until it thickens slightly.
- Dunk the baked chicken fingers into the sauce, ensuring they are well coated.
- Return them to the baking sheets and bake for an additional 4-5 minutes.
Serving
- Serve the chicken fingers topped with remaining sliced almonds and chopped cilantro.