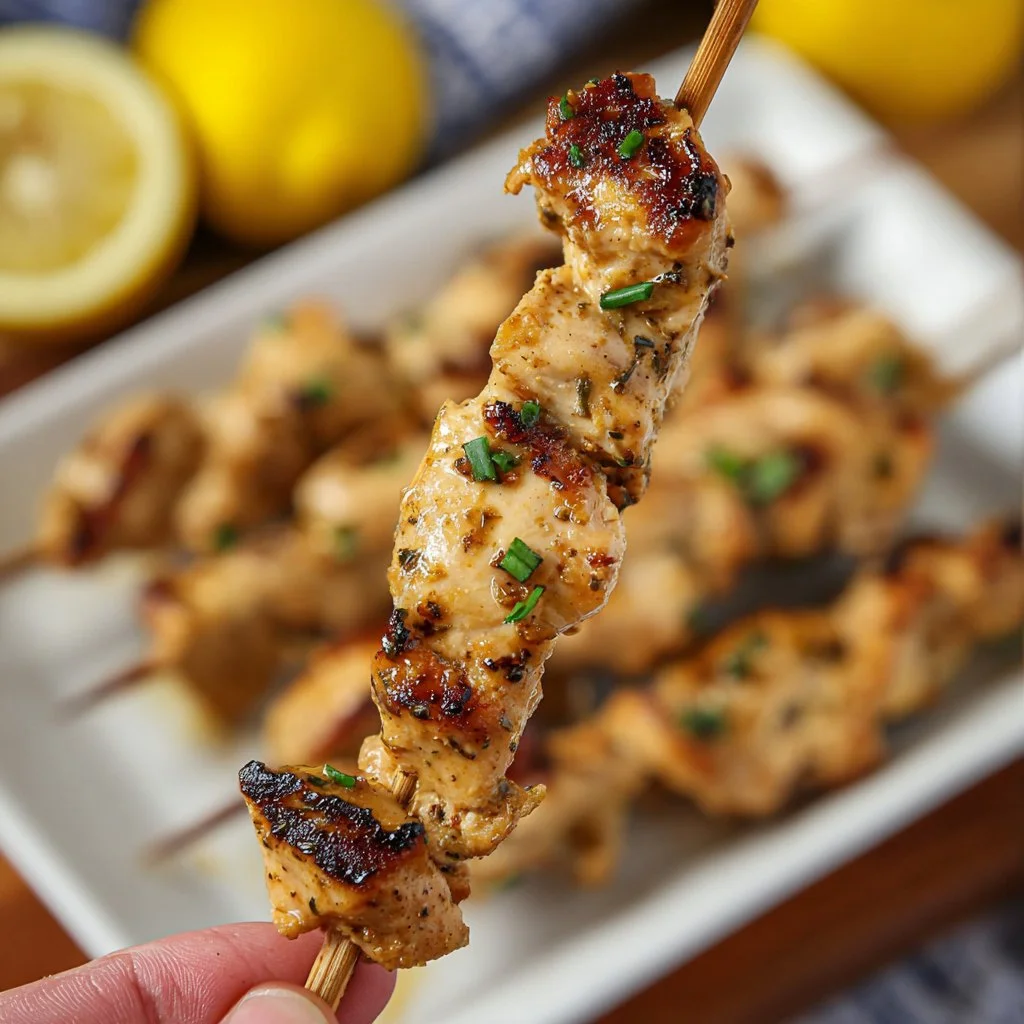
There’s something comforting about a simple, flavorful dinner that feels both satisfying and uncomplicated. This Garlic Butter Chicken recipe fits the bill perfectly, making it a delightful choice for weeknights, weekends, or even those quieter moments when you want a cozy meal. Its blend of garlic and butter creates a rich, savory flavor that pairs wonderfully with chicken, providing a dish that speaks to the heart of home cooking. Let’s dive into the recipe and enjoy the process together.
Why You’ll Love This Recipe Garlic Butter Chicken
This recipe is easy to follow and delivers great flavor while being reliable for any occasion. The combination of garlic and butter crafts a comforting taste that many find enjoyable. It’s a practical go-to meal that can fit into your everyday routine, making it a delightful option for dinner.
Kitchen Tools You’ll Need
- Large skillet
- Cutting board
- Knife
- Measuring cups and spoons
- Spatula or tongs
Ingredients
- 2x 9oz/250g Chicken Breasts (protein source)
- 1/4 cup / 40g Plain / All Purpose Flour (for coating)
- 1/2 cup / 120ml Chicken Stock (adds moisture)
- 6 tbsp / 90g Unsalted Butter (divided into tbsp chunks for richness)
- 2 cloves of Garlic (minced/finely diced, for flavor)
- 1 tbsp finely diced Fresh Parsley (for garnish)
- 1 tbsp Olive Oil (for cooking)
- 1 tsp Garlic Powder (for additional flavor)
- 1 tsp Salt (plus more to taste, for seasoning)
- 1/2 tsp Black Pepper (plus more to taste, for seasoning)
- 1 Lemon (divided into 4 wedges to serve, for brightness)

How to Make Garlic Butter Chicken
Step 1. Begin by preparing your chicken breasts. Pat them dry with paper towels to remove excess moisture, which helps in achieving a nice sear. Season both sides generously with salt and black pepper. The seasoning will enhance the chicken’s natural flavors.
Step 2. Next, coat the chicken breasts in the all-purpose flour, ensuring they are fully covered. This creates a slight crust on the chicken when cooked, adding texture and helping to seal in juices. Shake off any excess flour to avoid clumping when cooking.
Step 3. In a large skillet, heat the olive oil over medium-high heat. Allow the oil to warm up before placing the coated chicken breasts in the skillet. You’ll know it’s ready when the oil shimmers, which indicates it’s hot enough for searing.
Step 4. Cook the chicken in the skillet for about 5-7 minutes on one side without moving it around. This will help develop a golden-brown crust. Flip the chicken when it’s easy to lift, signaling it’s well-seared.
Step 5. Once flipped, cook the other side for an additional 5-7 minutes until the chicken is cooked through. You can check for doneness by cutting into the thickest part of the chicken; clear juices should run without any pink tint.
Step 6. Remove the chicken from the skillet and set it aside on a plate. In the same skillet, add the minced garlic and sauté for about a minute until fragrant. Take care not to burn the garlic, as it can turn bitter quickly.
Step 7. Pour in the chicken stock, stirring well to scrape up any browned bits from the bottom of the skillet. These bits add depth of flavor to the sauce. Let it simmer for a couple of minutes to let the flavors meld together.
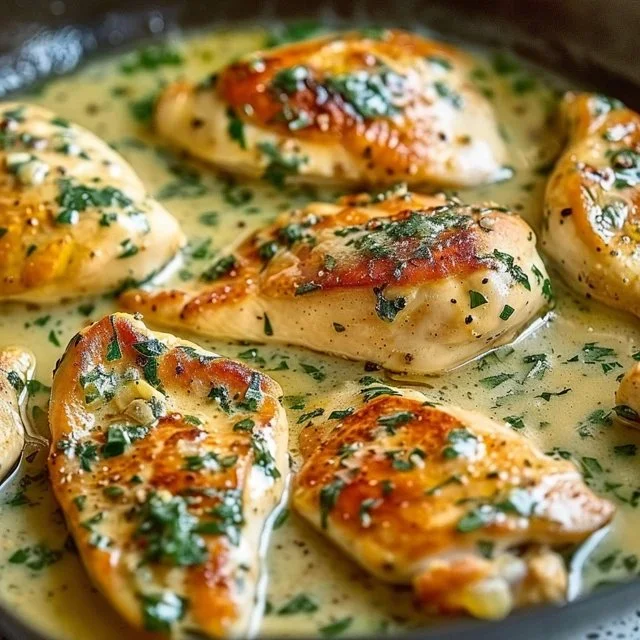
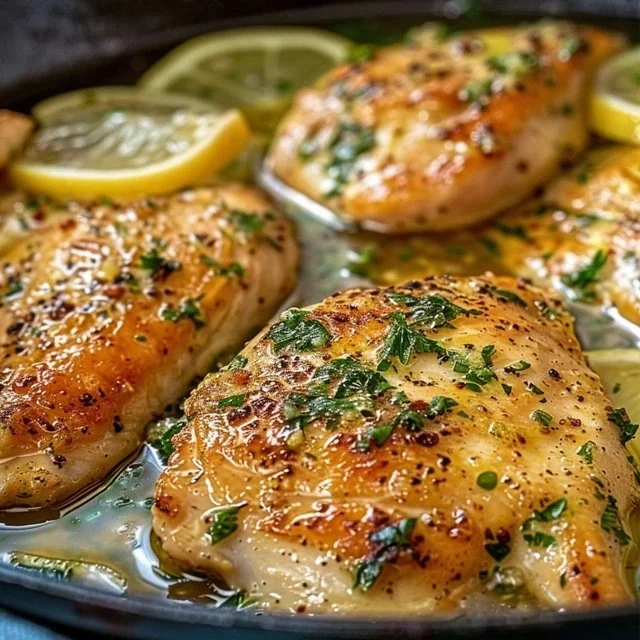
Step 8. Add the unsalted butter one tablespoon at a time, stirring to incorporate each piece into the sauce. This creates a rich, buttery sauce that will coat the chicken beautifully. Keep stirring until the butter is fully melted and the sauce has thickened slightly.
Step 9. Return the chicken to the skillet, spooning the garlic butter sauce over the top. Allow the chicken to heat through for another minute or so, ensuring it’s well-coated and infused with flavor.
Step 10. Finish by sprinkling the dish with finely diced fresh parsley for a touch of color and freshness. Serve with lemon wedges on the side to add a bright, zesty note that complements the richness of the dish.
Serving Suggestions
Garlic Butter Chicken is beautifully versatile and fits well into various meal settings. It makes for a lovely centerpiece for a family dinner, paired with simple sides like steamed vegetables or rice. Leftovers can be enjoyed the next day for lunch, either warm or cold in a wrap. If served over a bed of greens, it transforms into a satisfying salad. Feel free to adapt it for breakfast or brunch, topped on eggs or in a breakfast burrito.
Pro Tips for Best Results
- Make sure to pat the chicken dry before coating; this step ensures a better sear.
- Use fresh garlic for more robust flavor; it’s worth the extra few minutes.
- Monitor the heat carefully; too high can burn the butter and garlic.
- If desired, let the chicken rest a few minutes after cooking; this helps retain juices.
- Adjust seasoning at the end; sometimes, a little more salt or pepper is all it needs.
- Consider making extra sauce to drizzle over vegetables or grains.
Common Mistakes to Avoid
- Not drying the chicken: Wet chicken won’t sear properly, leading to a less desirable texture. Always pat it dry to ensure a good crust.
- Overcrowding the pan: Adding too much chicken at once can lower the skillet’s temperature, causing steaming instead of searing. Cook in batches if necessary.
- Using high heat without care: Cooking on too high of a heat can scorch the butter and garlic. Medium to medium-high heat is more suitable for even cooking.
- Not checking for doneness: This can lead to undercooked chicken. Use a thermometer or cut to ensure there’s no pink in the middle.
- Skipping the resting step: Cutting into the chicken immediately can let all the juices escape, resulting in dry meat. Let it rest briefly before slicing.
- Neglecting to taste and adjust: Seasoning is crucial. Always taste the sauce before serving and adjust seasoning as needed for the best flavor.
Variations & Substitutions
You might consider incorporating a splash of white wine into the sauce for an additional layer of flavor. For a slightly spicy kick, adding a pinch of red pepper flakes while sautéing the garlic can enhance the taste. If you prefer a lighter version, try using chicken thighs instead of breasts for more moisture. Alternatively, you could swap fresh parsley for fresh basil or chives to give the dish a different herbal note.
Storage & Reheating
Store leftovers in an airtight container at room temperature for up to 2 hours or in the refrigerator for up to 3 days. When refrigerating, it’s best to allow the dish to cool completely before sealing it. If you wish to freeze, you can store it in a freezer-safe container for up to 2 months. For reheating, gentle heat in a skillet works well to preserve the chicken’s texture, or you can use the microwave, ensuring not to overheat it.
Frequently Asked Questions
Can I make this recipe ahead of time?
Yes, you can prepare the dish ahead and refrigerate it before the final cooking steps. Just reheat gently before serving.
How long does it last in the fridge?
Garlic Butter Chicken can last in the refrigerator for up to three days when stored properly in an airtight container.
Can I freeze this recipe?
Yes, it can be frozen for up to two months. Ensure it’s in a freezer-safe container to maintain quality.
What can I substitute for one ingredient?
If you don’t have fresh parsley, fresh basil or chives can work well as alternatives for garnish.
Why didn’t my recipe turn out as expected?
Common issues include not drying the chicken enough or cooking on too high heat. Ensuring proper techniques can help achieve better results.
Final Thoughts
Making Garlic Butter Chicken offers a pleasant cooking experience, filled with the warm aromas of garlic and buttery goodness. It’s a comforting dish that stands out yet remains simple enough for those busy nights. Enjoy each bite, and trust that this recipe can become a cherished part of your meal rotation.

Garlic Butter Chicken
Ingredients
Main Ingredients
- 2 pieces Chicken Breasts 9oz/250g each
- 1/4 cup Plain / All Purpose Flour for coating
- 1/2 cup Chicken Stock adds moisture
- 6 tbsp Unsalted Butter divided into chunks for richness
- 2 cloves Garlic minced or finely diced
- 1 tbsp Fresh Parsley finely diced, for garnish
- 1 tbsp Olive Oil for cooking
- 1 tsp Garlic Powder for additional flavor
- 1 tsp Salt plus more to taste
- 1/2 tsp Black Pepper plus more to taste
- 1 piece Lemon divided into wedges to serve
Instructions
Preparation
- Pat the chicken breasts dry with paper towels to remove excess moisture.
- Season both sides generously with salt and black pepper.
- Coat the chicken breasts in all-purpose flour, ensuring they are fully covered.
Cooking
- In a large skillet, heat the olive oil over medium-high heat.
- Cook the chicken for about 5-7 minutes on one side until golden-brown.
- Flip the chicken and cook for another 5-7 minutes until cooked through.
- Remove the chicken from the skillet and set aside.
- In the same skillet, add minced garlic and sauté for about a minute.
- Pour in chicken stock and let it simmer for a couple of minutes.
- Add the butter, one tablespoon at a time, stirring until melted.
- Return the chicken to the skillet and spoon the sauce over it, allowing it to heat through.
- Finish with freshly diced parsley and lemon wedges on the side.